“Hey Facebook, What Type of Dog Is That?” – Adding Machine Learning to Messenger
Convolutional Neural Networks (CNNs) provide a powerful and scalable mechanism for preforming image classification. They can be relatively difficult to build, train, and tune from scratch, which is what makes tools like TensorFlow and the inception models so indispensable to improving our ML workflows.
That said for us .NET folks running python scripts out of an in-app shell is less than an ideal solution which is what makes the release of the ML.NET TensorFlow library so exciting.
What if I told you that with just a couple hundred lines of C# code and a little configuration you could build an ASP.NET core app that will house a powerful CNN that you can interact with as simple as sending a picture message to a Facebook page?
With training as simple as:
And a classification request as simple as:
Well, that’s precisely what we’re going to do – using ML.NET, we’re going to build a powerful classifier and then using Nexmo’s Messages API and Messenger we’re going to create a powerful, easy to use, vector for training and classification.
Learning Objectives
In this tutorial, we will:
- Create an ML.NET TensorFlow Neural Network
- Train that Neural Network to recognize different types of dogs
- Create a Messaging vector to ask the Neural Network to classify dogs it’s never seen before
- Create a Learning vector to allow the Neural Network to learn new types of dogs dynamically.
Prerequisites
- Visual Studio 2019 version 16.3 or higher
- A Nexmo account Sign up here
- A linked Facebook Page to your Nexmo account See here for setup
- Optional: Ngrok for test deployment
Project Setup
First thing’s first – let’s open Visual Studio, Create a new ASP.NET Core 3.0 API application and call it MessagesTensorFlow. Now let’s add the following NuGet packages to the solution:
- BouncyCastle
- jose-jwt
- Microsoft.ML
- Microsoft.ML.ImageAnalytics
- Microsoft.ML.TensorFlow
- Newtonsoft.Json
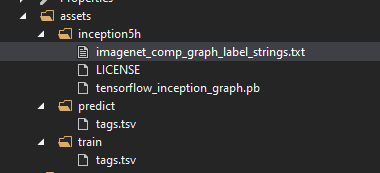
We’re going to be starting off our neural net with the Inception V1 model and then seeding it with images / labels off disk. Create a folder under the MessagesTensorFlow directory called assets.
In assets download and unzip the Inception V1 Model
Also, under assets, create a folder called train and predict. Under each of those directories, add a tags.tsv file. Your directory structure should look something like this now:
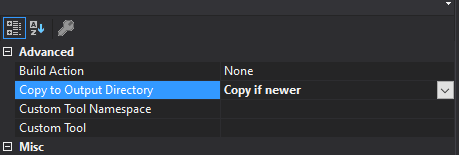
Now go to each file and in the advanced properties section set the Copy to Output Directory to Copy if newer
Creating the Learner
Let’s now create the class that’s going to actually hold our neural network. Create a file called TFEngine.cs.
Imports
Add the following imports to the top of the file:
using Microsoft.ML;using Microsoft.ML.Data;using System;using System.Collections.Generic;using System.IO;using System.Linq;using System.Net;Class Setup
Then inside the TFEngine class let’s add some paths so we can access everything all the files we’ll be ingesting into our model. As well as some settings for managing the inception data.
static readonly string \_assetsPath = Path.Combine(Environment.CurrentDirectory, "assets");static readonly string \_imagesFolder = Path.Combine(\_assetsPath, "train");static readonly string \_savePath = Path.Combine(\_assetsPath, "predict");static readonly string \_trainTagsTsv = Path.Combine(\_imagesFolder, "tags.tsv");static readonly string \_inceptionTensorFlowModel = Path.Combine(\_assetsPath, "inception5h", "tensorflow\_inception\_graph.pb");const int ImageHeight = 224;const int ImageWidth = 224;const float Mean = 117;const bool ChannelsLast = true;Let’s also set this class up as a singleton and allow only one access to it at a time. We’re also going to add a webClient for downloading the image URLs.
static readonly object \_lock = new object();private static WebClient \_client = new WebClient();private static TFEngine \_instance;public static TFEngine Instance{ get { lock (\_lock) { if (\_instance == null) { \_instance = new TFEngine(); } return \_instance; } }}private TFEngine(){ \_mlContext = new MLContext(); GenerateModel();}We’re also going to create some fields to hold our pipeline that will be used to create our model, the model that will be used to perform the prediction, and the MLContext.
private IEstimator<ITransformer> \_pipeline;private ITransformer \_model;private MLContext \_mlContext;Next add a class ImageData which will hold the image data as it passes through the model
public class ImageData{ [LoadColumn(0)] public string ImagePath; [LoadColumn(1)] public string Label;}Then create a structure to house the prediction data as it flows out of the model:
public class ImagePrediction : ImageData{ public float[] Score; public string PredictedLabelValue;}The score will be an array containing the probabilities the neural net assigns to each possible label, and the PredictedLabelValue will, of course, be prediction from the network (the item with the highest score)
Model Training
Now it’s time to train our model!
Add a method called GenerateModel
public void GenerateModel(){ \_pipeline = \_mlContext.Transforms.LoadImages(outputColumnName: "input", imageFolder: \_imagesFolder, inputColumnName: nameof(ImageData.ImagePath))//Loads the images from the image folder .Append(\_mlContext.Transforms.ResizeImages(outputColumnName: "input", imageWidth: ImageWidth, imageHeight: ImageHeight, inputColumnName: "input"))//Resizes all of the images to a size the inception model can work with it .Append(\_mlContext.Transforms.ExtractPixels(outputColumnName: "input", interleavePixelColors: ChannelsLast, offsetImage: Mean))//Extract pixels from the images for use .Append(\_mlContext.Model.LoadTensorFlowModel(\_inceptionTensorFlowModel)// Loads the tensorflow model from the inception .pb file .ScoreTensorFlowModel(outputColumnNames: new[] { "softmax2\_pre\_activation" }, inputColumnNames: new[] { "input" }, addBatchDimensionInput: true))// scores input images against the tensorflow models softmax2\_pre\_activation layer - a vector of features that might describe an input image .Append(\_mlContext.Transforms.Conversion.MapValueToKey(outputColumnName: "LabelKey", inputColumnName: "Label"))// maps the ImageData's label to the output column labelKey .Append(\_mlContext.MulticlassClassification.Trainers.LbfgsMaximumEntropy(labelColumnName: "LabelKey", featureColumnName: "softmax2\_pre\_activation"))// creates the multiclass classifier from the tensorflow model .Append(\_mlContext.Transforms.Conversion.MapKeyToValue("PredictedLabelValue", "PredictedLabel")) // for the predictor - maps the predictedlabelValue to the PredictedLabel Key .AppendCacheCheckpoint(\_mlContext);// fits the training data to the model - et voila - we have our classifier IDataView trainingData = \_mlContext.Data.LoadFromTextFile<ImageData>(path: \_trainTagsTsv, hasHeader: false); \_model = \_pipeline.Fit(trainingData);}This is really the heart of what’s going to make our predictor work. The ‘_pipeline =’ section is a chain of commands that will:
- Load the images off of the disk
- Resize the images for ingestion
- Extract and vectorize the pixels in the images
- Load the inception TensorFlow model (essentially our pre-made neural net)
- Create a training model and run the training data through it to create a prediction model for us to use
Classifying a Single Image
With our model trained we can now go about creating a method that will take in a file name and return a string containing a prediction and the networks confidence in the prediction. This function takes an imageUrl, saves the file to the disk, classifies the image and returns a string containing the classifiers guess with its confidence.
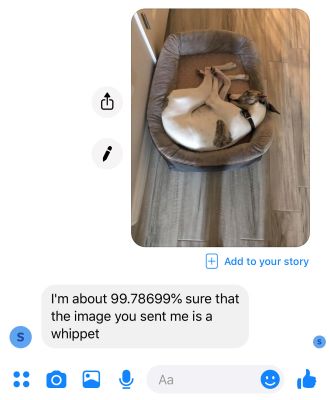
public string ClassifySingleImage(string imageUrl){ try { var filename = Path.Combine(\_savePath, $"{Guid.NewGuid()}.jpg"); \_client.DownloadFile(imageUrl, filename); var imageData = new ImageData() { ImagePath = filename }; var predictor = \_mlContext.Model.CreatePredictionEngine<ImageData, ImagePrediction>(\_model); var prediction = predictor.Predict(imageData); var response = $"I'm about {prediction.Score.Max() \* 100}% sure that the image you sent me is a {prediction.PredictedLabelValue}"; Console.WriteLine($"Image: {Path.GetFileName(imageData.ImagePath)} predicted as: {prediction.PredictedLabelValue} with score: {prediction.Score.Max() \* 100} "); return response; } catch (Exception) { return "Something went wrong when trying to classify image"; }}Adding Training Data
The final operation we’re going to ask of the Tensor Flow Engine is essentially the reverse of prediction, we’ll ask it to accept an image URL and label and update itself to better recognize images of that label. The AddTrainingImage saves the provided image to disk, appends information about that images to the tags.tsv file, and regenerates the model.
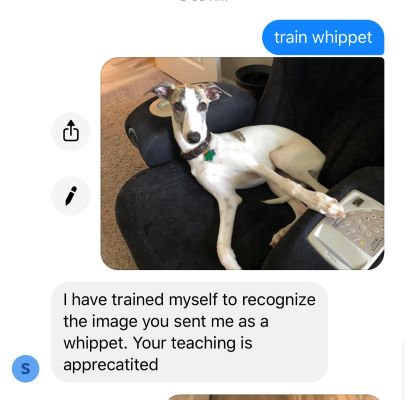
public string AddTrainingImage(string imageUrl, string label){ try { var id = Guid.NewGuid(); var fileName = Path.Combine(\_imagesFolder, $"{id}.jpg"); \_client.DownloadFile(imageUrl, fileName); File.AppendAllText(\_trainTagsTsv, $"{id}.jpg\t{label}" + Environment.NewLine); IDataView trainingData = \_mlContext.Data.LoadFromTextFile<ImageData>(path: \_trainTagsTsv, hasHeader: false); \_model = \_pipeline.Fit(trainingData); return $"I have trained myself to recognize the image you sent me as a {label}. Your teaching is appreciated"; } catch (Exception) { return "something went wrong when trying to train on image"; }}Using the Messages API to Drive Classification and Training
Messages Objects
Next we’re going to add some POCOs to hold our messaging data as it comes in and goes out to the Messages API – these objects are fairly verbose and don’t do anything particularly interesting aside from allowing the serialization / deserialization of JSON so, for the sake of brevity feel free to simply use the following structures:
Interacting With the API
Creating these structures frees us up to manage the data we are getting from and sending out to the Messages API. However we need one more step to enable us to actually use the API – we’ll need to generate a JWT to authenticate our application with the Messages API. To this end, let’s create the following files.
- TokenGenerator.cs
- MessageSender.cs
Generate JWT
TokenGenerator is going to have one static method GenerateToken which will accept a list of Claims and the privateKey for your application
using Org.BouncyCastle.Crypto.Parameters;using Org.BouncyCastle.OpenSsl;using Org.BouncyCastle.Security;using System.Collections.Generic;using System.IO;using System.Linq;using System.Security.Claims;using System.Security.Cryptography;namespace MessagesTensorFlow{ public class TokenGenerator { public static string GenerateToken(List<Claim> claims, string privateKey) { RSAParameters rsaParams; using (var tr = new StringReader(privateKey)) { var pemReader = new PemReader(tr); var kp = pemReader.ReadObject(); var privateRsaParams = kp as RsaPrivateCrtKeyParameters; rsaParams = DotNetUtilities.ToRSAParameters(privateRsaParams); } using (RSACryptoServiceProvider rsa = new RSACryptoServiceProvider()) { rsa.ImportParameters(rsaParams); Dictionary<string, object> payload = claims.ToDictionary(k => k.Type, v => (object)v.Value); return Jose.JWT.Encode(payload, rsa, Jose.JwsAlgorithm.RS256); } } }}This will generate a JWT for your usage with the Messages API.
Generate a Claims List for JWT
In the MessageSender.cs we’ll have a method to generate the claims for the JWT from your appId:
private static List<Claim> GetClaimsList(string appId){ const int SECONDS\_EXPIRY = 3600; var t = DateTime.UtcNow - new DateTime(1970, 1, 1); var iat = new Claim("iat", ((Int32)t.TotalSeconds).ToString(), ClaimValueTypes.Integer32); // Unix Timestamp for right now var application\_id = new Claim("application\_id", appId); // Current app ID var exp = new Claim("exp", ((Int32)(t.TotalSeconds + SECONDS\_EXPIRY)).ToString(), ClaimValueTypes.Integer32); // Unix timestamp for when the token expires var jti = new Claim("jti", Guid.NewGuid().ToString()); // Unique Token ID var claims = new List<Claim>() { iat, application\_id, exp, jti }; return claims;}Read App Settings and Create JWT
Then we’ll have another method to read the relevant items out of your configuration, which the controller will hand us through Dependency Injection, retrieve the claims list, and build the JWT
private static string BuildJwt(IConfiguration config){ var appId = config["Authentication:appId"]; var priavteKeyPath = config["Authentication:privateKey"]; string privateKey = ""; using (var reader = File.OpenText(priavteKeyPath)) // file containing RSA PKCS1 private key privateKey = reader.ReadToEnd(); var jwt = TokenGenerator.GenerateToken(GetClaimsList(appId), privateKey); return jwt;}This will of course require a couple of items in your appsettings.json file Add the following object to your appsettings.json file and fill in with the appropriate values:
"Authentication": { "appId": "app\_id", "privateKey": "path\_to\_key\_file" }Send a Message
Now we’re going to tie this all together with our SendMessage method, which will take our message, toId, fromId, and config. This method will generate a JWT and send along a request to the Messages API to send a message containing the feedback from our classifier to our end user.
public static void SendMessage(string message, string fromId, string toId, IConfiguration config){ const string MESSAGING\_URL = @"https://api.nexmo.com/v0.1/messages"; try { var jwt = BuildJwt(config); var requestObject = new MessageRequest() { to = new MessageRequest.To() { id = toId, type = "messenger" }, from = new MessageRequest.From() { id = fromId, type = "messenger" }, message = new MessageRequest.Message() { content = new MessageRequest.Message.Content() { type = "text", text = message }, messenger = new MessageRequest.Message.Messenger() { category = "RESPONSE" } } }; var requestPayload = JsonConvert.SerializeObject(requestObject, new JsonSerializerSettings() { NullValueHandling = NullValueHandling.Ignore, DefaultValueHandling = DefaultValueHandling.Ignore }); var httpWebRequest = (HttpWebRequest)WebRequest.Create(MESSAGING\_URL); httpWebRequest.ContentType = "application/json"; httpWebRequest.Accept = "application/json"; httpWebRequest.Method = "POST"; httpWebRequest.PreAuthenticate = true; httpWebRequest.Headers.Add("Authorization", "Bearer " + jwt); using (var streamWriter = new StreamWriter(httpWebRequest.GetRequestStream())) { streamWriter.Write(requestPayload); } using (var httpResponse = (HttpWebResponse)httpWebRequest.GetResponse()) { using (var streamReader = new StreamReader(httpResponse.GetResponseStream())) { var result = streamReader.ReadToEnd(); Console.WriteLine(result); Console.WriteLine("Message Sent"); } } } catch (Exception e) { Debug.WriteLine(e.ToString()); }}Classification Handler
We’re going to want the handling of inbound webhooks to be asynchronous and respond immediately, so we’re going to create a ClassificationHandler.cs file to actually handle the classify / reply operations. This file will contain a couple of small structures to allow us to unpack, classify or train, and reply to inbound messages.
In ClassificationHandler.cs add the following code:
public static void ClassifyAndRespond(object state){ var request = state as ClassifyRequest; var response = TFEngine.Instance.ClassifySingleImage(request.imageUrl); MessageSender.SendMessage(response, request.toId, request.fromid, request.Configuration);}public static void AddTrainingData(object state){ var request = state as TrainRequest; var response = TFEngine.Instance.AddTrainingImage(request.imageUrl, request.Label); MessageSender.SendMessage(response, request.toId, request.fromid, request.Configuration);}public class TrainRequest : Request{ public string Label { get; set; }}public class ClassifyRequest : Request{}public abstract class Request{ public string imageUrl { get; set; } public string toId { get; set; } public string fromid { get; set; } public IConfiguration Configuration { get; set; }}Handle Incoming Messages Webhooks
From our code’s perspective the final thing we’re going to need to do is to create a couple of controllers to handle the incoming messages and status from the Messages API.
In the Controllers folder, add 2 “API controller – Empty” called InboundController and StatusController.
Status Controller
The Status controller is going to provide status to our application’s messages as they flow through the API, to keep track of what’s going on, let’s add a post method to the Status controller to write the status contents out to the debug console:
[HttpPost]public HttpStatusCode Post([FromBody]StatusMessage message){ Debug.WriteLine(JsonConvert.SerializeObject(message)); return HttpStatusCode.NoContent;}Inbound Controller
The Inbound Controller is going to be managing the Inbound Messages from our webhook.
Class Setup
Let’s first set it up by creating a dictionary for the pending training labels, a Configuration object for the controller to access the configuration, and by Dependency Injecting the Configuration into the Inbound Controller constructor:
public static Dictionary<string, string> \_pendingTrainLabels = new Dictionary<string, string>();public IConfiguration Configuration { get; set; }public InboundController(IConfiguration configuration){ Configuration = configuration;}Handling Inbound Messages
Next, we’ll write the actual InboundMessage handler. This handler will be a POST request. It will check to see if there’s any text in the message. If there is, it will see if the first word in that message is ‘train.’ If so it will save the rest of the message as a training label, and the next time that user sends a message with a picture, the classifier will be trained with that image and label.
On any other image message it will simply classify the image and send the output of the classification back to the message sender.
In both cases it starts a WorkItem in the ThreadPool, passing in one of those handy ClassificationHandler request objects we generated earlier – this unblocks the controller to send a status back to the messages api (in this case a 204 to inform it that it received the message)
[HttpPost]public HttpStatusCode Post([FromBody]InboundMessage message){ const string TRAIN = "train"; try { Debug.WriteLine(JsonConvert.SerializeObject(message)); if (!string.IsNullOrEmpty(message.message.content.text)) { var split = message.message.content.text.Split(new[] { ' ' }, 2); if (split.Length > 1) { if (split[0].ToLower() == TRAIN) { var label = split[1]; var requestor = message.from.id; if (!\_pendingTrainLabels.ContainsKey(requestor)) { \_pendingTrainLabels.Add(requestor, label); } else { \_pendingTrainLabels[requestor] = label; } } } } if (\_pendingTrainLabels.ContainsKey(message.from.id) && message.message.content?.image?.url != null) { ThreadPool.QueueUserWorkItem(ClassificationHandler.AddTrainingData, new ClassificationHandler.TrainRequest() { toId = message.to.id, fromid = message.from.id, imageUrl = message.message.content.image.url, Label = \_pendingTrainLabels[message.from.id], Configuration = Configuration }); \_pendingTrainLabels.Remove(message.from.id); } else { ThreadPool.QueueUserWorkItem(ClassificationHandler.ClassifyAndRespond, new ClassificationHandler.ClassifyRequest() { toId = message.to.id, fromid = message.from.id, imageUrl = message.message.content.image.url, Configuration = Configuration }); } return HttpStatusCode.NoContent; } catch (Exception ex) { return HttpStatusCode.NoContent; }}Seeding With a Little Data.
You can add whatever images and tags you want to get yourself started. For the sake of simplicity I’m only going to start with one image – an image of my dog (aptly named Zero).

I’m going to put that image in the assets/train directory.
Now since Zero is a whippet, I’m going to, in the tags.tsv file in the assets/train folder, add the file name ‘zero.jpg’ followed by a tab, followed by the label ‘whippet’ followed by a new line
zero.jpg whippetTesting
With this done, all that’s left to do is fire it up, expose it to the internet, and test it out. I use ngrok and IIS express to test it.
IIS Express Config
First go into the project properties debug tab and look for the App Url – specifically which port it’s going to be using – I uncheck the Enable SSL box for testing.
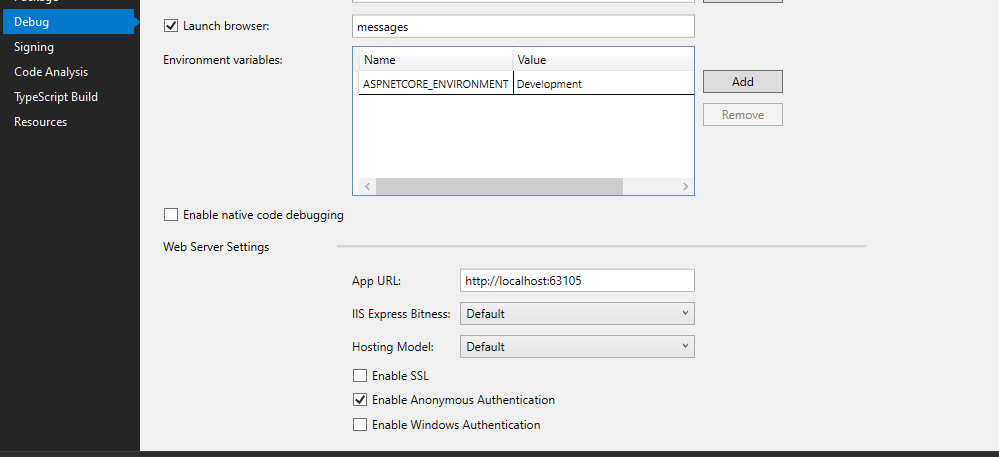
Then launch the site from visual studio using IIS Express – you’ll see the port in the address bar of the browser which pops up – in my sample I cleaned out all the weather controller stuff that comes out of the box so I get a 404 when I fire it up – which is fine as this is really only acting as a web service to listen for and reply to webhooks. There isn’t any get requests to propagate a page back to your web browser.
Using Ngrok to Expose the Port to the Internet
For the Messages API to forward the messages we’ll need to expose the site to the internet – for testing purposes, we’ll use ngrok to expose our IIS express port. Open up your command line and use this command, replace “ with your port number.
ngrok http --host-header="localhost:" http://localhost:
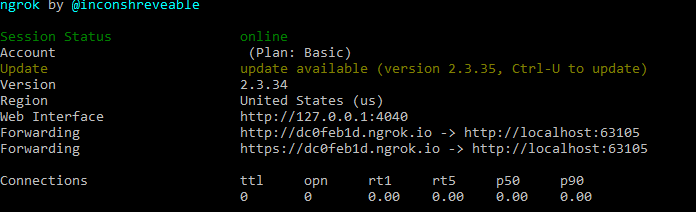
This command produces an output like this:
Configuring the Webhooks
Using the http link we just got from ngrok you can create the url that the webhook will be calling back on – you can see in the Route of the controllers we just made what the route will look like:
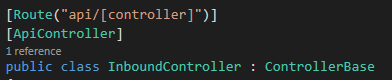
It’s going to work out to be
http://dc0feb1d.ngrok.io/api/Status for status messages
and
http://dc0feb1d.ngrok.io/api/Inbound for inbound messages
NOTE: The first part of the url (dc0feb1d) will change whenever you restart ngrok on the free tier.
We’ll use those callback URLs to register our webhooks with Nexmo.
Go To https://dashboard.nexmo.com and login to your Nexmo account
Go to messages and dispatch -> Your applications and select the edit button for your application
On the edit screen change the Status URL and Inbound URL fields to the noted values above and click the blue save button in the lower right hand corner.
And that’s it. Now you have a classifier / learner that you can feed images over messenger.
Helpful Links
- The full overview of the Messages API
- All the code from this tutorial
- ML.NET Tensor Flow documentation for more information about ML.NET Tensor Flow – in fact, the TFEngine’s GenerateModel function is derived from this tutorial.
The post “Hey Facebook, What Type of Dog Is That?” – Adding Machine Learning to Messenger appeared first on Nexmo Developer Blog.