How to Send an SMS With ASP.NET Core MVC
I still remember the first time I started working with MVC. It was, by far, the most intuitive experience I’d ever had with a framework in my career, to that point. Mind you, I came from writing OS Services using WCF to traverse internal network topographies, so take my praises with a grain of salt, but MVCs always had a special place in my heart. With the release of the new .NET 5.0.0 SDK, I’d like to take a step back and start working through the basics again. And what better place to start than sending an SMS with ASP.NET Core MVC?
Jump Right to the Code
If you want to just get the code, you can find it in GitHub here.
Prerequisites
- You’ll need a Vonage API account. You can [sign up here].(https://dashboard.nexmo.com/sign-up)
- You’ll need the latest version of the .NET Core 3.1 SDK.
- You’ll need either Visual Studio 2019, Visual Studio for Mac, or Visual Studio Code. I will be using Visual Studio 2019 for this demo.
Create the App
Navigate to wherever you want your source code to live and run the following command in your console.
dotnet new mvc -n SendSmsAspDotnetMvcThis will create a new ASP.NET Core MVC application for you. Use the cd command to go into the SendSmsAspDotnetMvc directory and open the SendSmsAspDotnetMvc.csproj file in Visual Studio.
Install the Nexmo Nuget Package
You’ll need to pull in the Nexmo Nuget package. You can easily do this from within the SendSmsAspDotnetMvc directory by running the following.
dotnet add package Nexmo.Csharp.Client --version 5.0.0Alternatively, you can install it with the NuGet GUI, or with the package manager CLI.
M is For Model
Let’s now go ahead and create our model in Visual Studio, right-click on the Models folder and go to add -> new. From this dialog, create a new cs file called SmsModel. You can clear out all the usings at the beginning of this, all we’re going to need is using System.ComponentModel.DataAnnotations; then inside the class itself we’re going to add the following fields.
[Required(ErrorMessage = "To Number Required", AllowEmptyStrings = false)]
[Phone]
[Display(Name = "To Number")]
public string To { get; set; }

[Required(ErrorMessage = "From Number Required", AllowEmptyStrings = false)]
[Phone]
[Display(Name = "From Number")]
public string From { get; set; }

[Required(ErrorMessage = "Message Text Required", AllowEmptyStrings = false)]
[Display(Name = "Message Text")]
public string Text { get; set; }
}
This model will take a To, From, and Text. These fields will correspond to the number your SMS is going to, the Vonage Virtual Number your SMS will be coming from, and the text is the message that is being sent to the To number. The Data Annotations will control how the fields are displayed in our form, and it will validate that we have appropriate inputs when we send it onto our server.
V is For View
Now that we have our model created, let’s move onto creating our view. Our view is going to be called “Sms.” So underneath the Views folder, create a new folder called Sms and add an index.cshtml file to that folder.
Set the Startup View to SMS
Let’s go ahead and force this app to point directly at our Sms view when it starts. Go into Startup.cs and find the app.UseEndpoints call, and switch the Controller of the default route from Home to Sms.
Build Our View
In the index.cshtml file, the only thing we need to do is create the form that will send the SMS to our Controller. Add the following razor to build the form for us and ensure that it’s all validated when the form is submitted.
@model SmsModel
@using (Html.BeginForm("sms", "sms", FormMethod.Post))
{
<div class="form-vertical">
<h4>
Sms<h4>
@Html.ValidationSummary(true, "", new { @class = "text-danger" })
<div class="form-group">
@Html.LabelFor(model => model.To)
<div>
@Html.EditorFor(model => model.To, new { htmlAttributes = new { @class = "form-control" } })
@Html.ValidationMessageFor(model => model.To, "", new { @class = "text-danger" })
</div>
</div>
<div class="form-group">
@Html.LabelFor(model => model.From)
<div>
@Html.EditorFor(model => model.From, new { htmlAttributes = new { @class = "form-control" } })
@Html.ValidationMessageFor(model => model.From, "", new { @class = "text-danger" })
</div>
</div>
<div class="form-group">
@Html.LabelFor(model => model.Text)
<div>
@Html.EditorFor(model => model.Text, new { htmlAttributes = new { @class = "form-control" } })
@Html.ValidationMessageFor(model => model.Text, "", new { @class = "text-danger" })
</div>
</div>
<div class="form-group">
<div class="col-md-offset-2 col-md-10">
<button type="submit">Send</button>
</div>
</div>
</div>
}
<h2>@ViewBag.MessageId<h2>
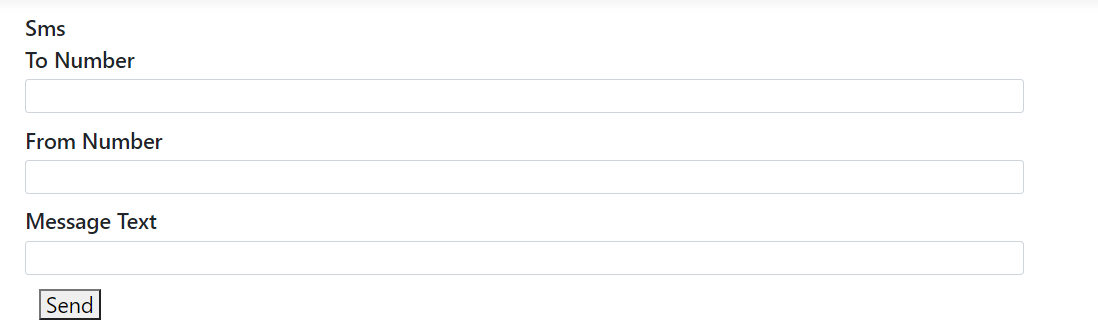
<h3>@ViewBag.Error</h3>When this is created, it will look something like this.
C is for Controller
With the Model and View created, the last thing we’ll need is a controller. Our View Directly references an Sms controller’s Sms method, so let’s go ahead and create that Sms Controller. Right-click on the Controllers folder, and go to add->Controller. Just create an Empty MVC Controller and Name it SmsController.
Dependency Inject Configuration
Using the Vonage SMS API Requires us to pull an API Key and Secret. We don’t want to hard code those, so we’re going to be passing them through the configuration. To this end, we’re going to use dependency injection to actually get the configuration. This involves adding a new property of type IConfiguration, and creating a constructor for the Controller that takes an IConfiguration object and assigns that object to our configuration property, like so.
public IConfiguration Configuration { get; set; }

public SmsController(IConfiguration config)
{
    Configuration = config;
}
Create The Send Sms Action
Next, we need to create an action that will actually send the SMS. We’ll take a SmsModel that we created earlier and validate it. Then we’ll pull the API key and secret from our configuration. Next, we’ll send the Sms Message. Finally, we’ll pull the message ID back into our view bag. If anything goes wrong with the request, we’ll catch it in a NexmoSmsResponseException and display the error. That method is going to look like this.
[HttpPost]
public IActionResult Sms(Models.SmsModel sendSmsModel)
{
    if (ModelState.IsValid)
    {
        try
        {
            var VONAGE_API_KEY = Configuration["VONAGE_API_KEY"];
            var VONAGE_API_SECRET = Configuration["VONAGE_API_SECRET"];
            var credentials = Credentials.FromApiKeyAndSecret(VONAGE_API_KEY, VONAGE_API_SECRET);
            var client = new SmsClient(credentials);
            var request = new SendSmsRequest { To = sendSmsModel.To, From = sendSmsModel.From, Text = sendSmsModel.Text };
            var response = client.SendAnSms(request);
            ViewBag.MessageId = response.Messages[0].MessageId;
        }
        catch(NexmoSmsResponseException ex)
        {
            ViewBag.Error = ex.Message;
        }
    }
    return View("Index");
}
Configure the Application
We are pulling the API key and secret out of the configuration. We’ll need to go into the appsettings.json file and add the VONAGE_API_KEY and the VONAGE_API_SECRET fields to the configuration object. You can obtain the required values from your dashboard. Just add these fields to your appsettings.json and you’re good to go.
Testing
You can boot this up by either running it in IIS Express or by using the dotnet run command. Then, go to the main index of the site that you created where you’ll see your form. Enter your cell phone number, the Vonage Virtual number the message will be coming from, the message you’d like to send, and click the send button. The MessageId ought to appear underneath, and the text message should show on your phone.
Resources
- The code from this tutorial can all be found in GitHub.
The post How to Send an SMS With ASP.NET Core MVC appeared first on Vonage Developer Blog.