Santa’s Nexmo Helper – C# Advent Series
‘Tis the season of Advent, such a busy time for so many, but none more than Ol’ St. Nick, whose feast day the Eastern Rite celebrates today. In honor of the season of C# Advent that’s upon us, we’re going to help Santa out by automating some of his correspondence and providing him more modern means of fielding questions than the postal service.
To crystallize our goal here, we are going to create an FAQ bot for Santa that can be reached over, and respond via, Facebook Messenger, WhatsApp, and SMS.
We’re going to build this with the help of QnAMaker and of course the Nexmo Messages API
Prerequisites
- Visual Studio 2019 version 16.3 or higher
- A Nexmo account. If you don’t have one, you can sign up here
- An Azure Account
- Optional: Ngrok for test deployment
- Optional: For Facebook Messenger, we will need to link a Facebook Page to our Nexmo account—you can see step by step instructions on Nexmo Developer. Completing part 2 of the guide will create a Nexmo App with a linked Facebook Page; be sure to save the private key file that is generated for this application.
Note: The code in this demo will work with WhatsApp Messages once WhatsApp Business is configured. That said, WhatsApp is more meant for a business case—to see more details about getting an app configured for WhatsApp you can look at the guide on Nexmo Developer
Building Our Bot
Setup
To build out our bot we are going to head over to QnAMaker and sign in using an Azure account.
Click “Create a Knowledge Base”.
Follow the instructions in step 1 for creating a QnA service in Azure.
For Step 2, set the following:
- Microsoft Azure Directory ID
- The Subscription’s name from the Azure account
- The QnA service we’re going to use (this will match the Service Name we just created in the Azure Portal)
- The language of our bot
For Step 3 we’re going to name our knowledge base “Santa’s Nexmo Helper.”
Step 4 is where QnA Maker gets cool—populating this bot’s knowledge base is as easy as linking it to an FAQ page or uploading an FAQ file. Of course for this demo, we’re going to use the official Santa Claus website’s FAQ page.
We’re also going to add some chitchat to our bot—since our bot is going to be an honorary elf, we’re going to use the witty chitchat selection
With all this set, click Create Knowledge Base.
This will ingest the FAQ’s that we pointed QnA Maker at and will bring us to a page that looks like this:
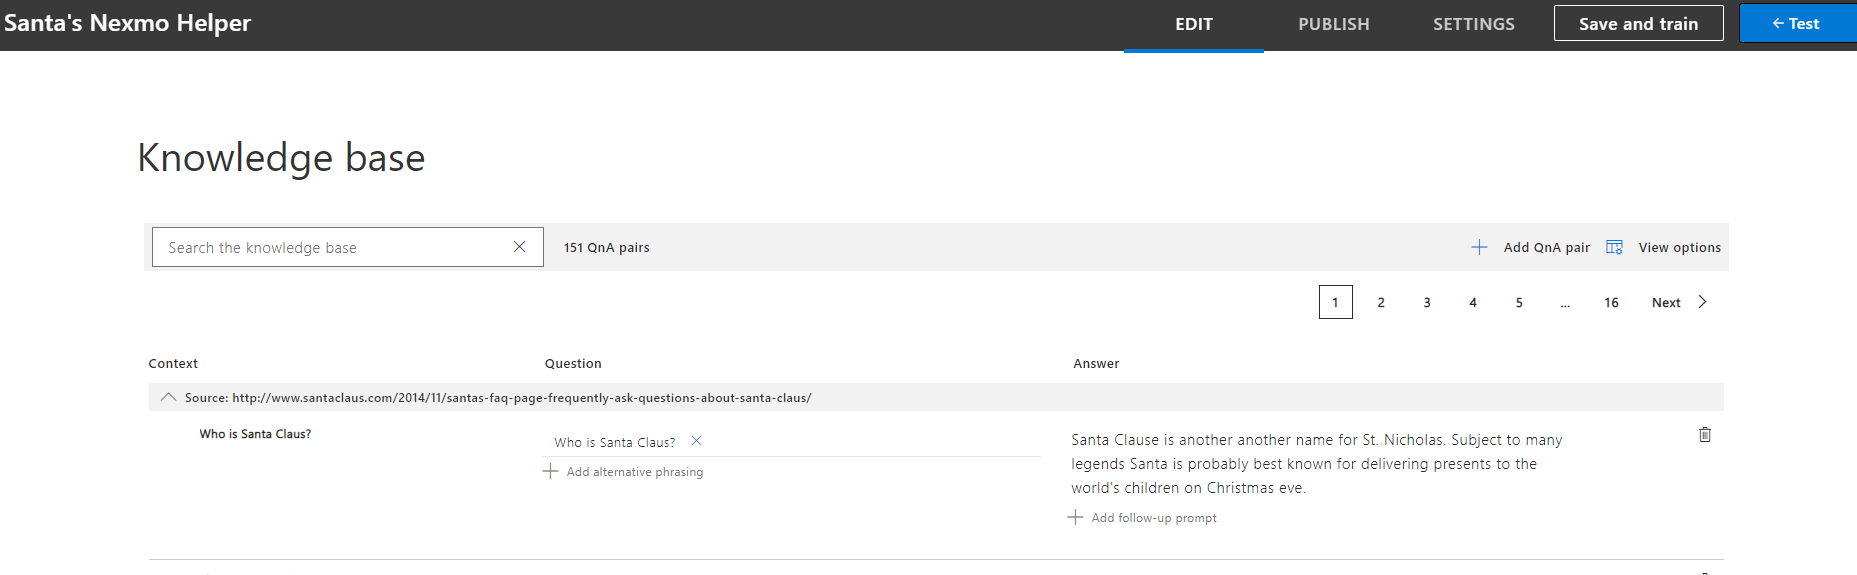
Editing, Publishing, and Testing Our Knowledgebase
This is our Knowledgebase edit screen. From here we can see what our knowledge base looks like. We can also freely edit it if we want to change some answers; e.g. maybe let’s shorten the “Who Is Santa Claus?” answer.
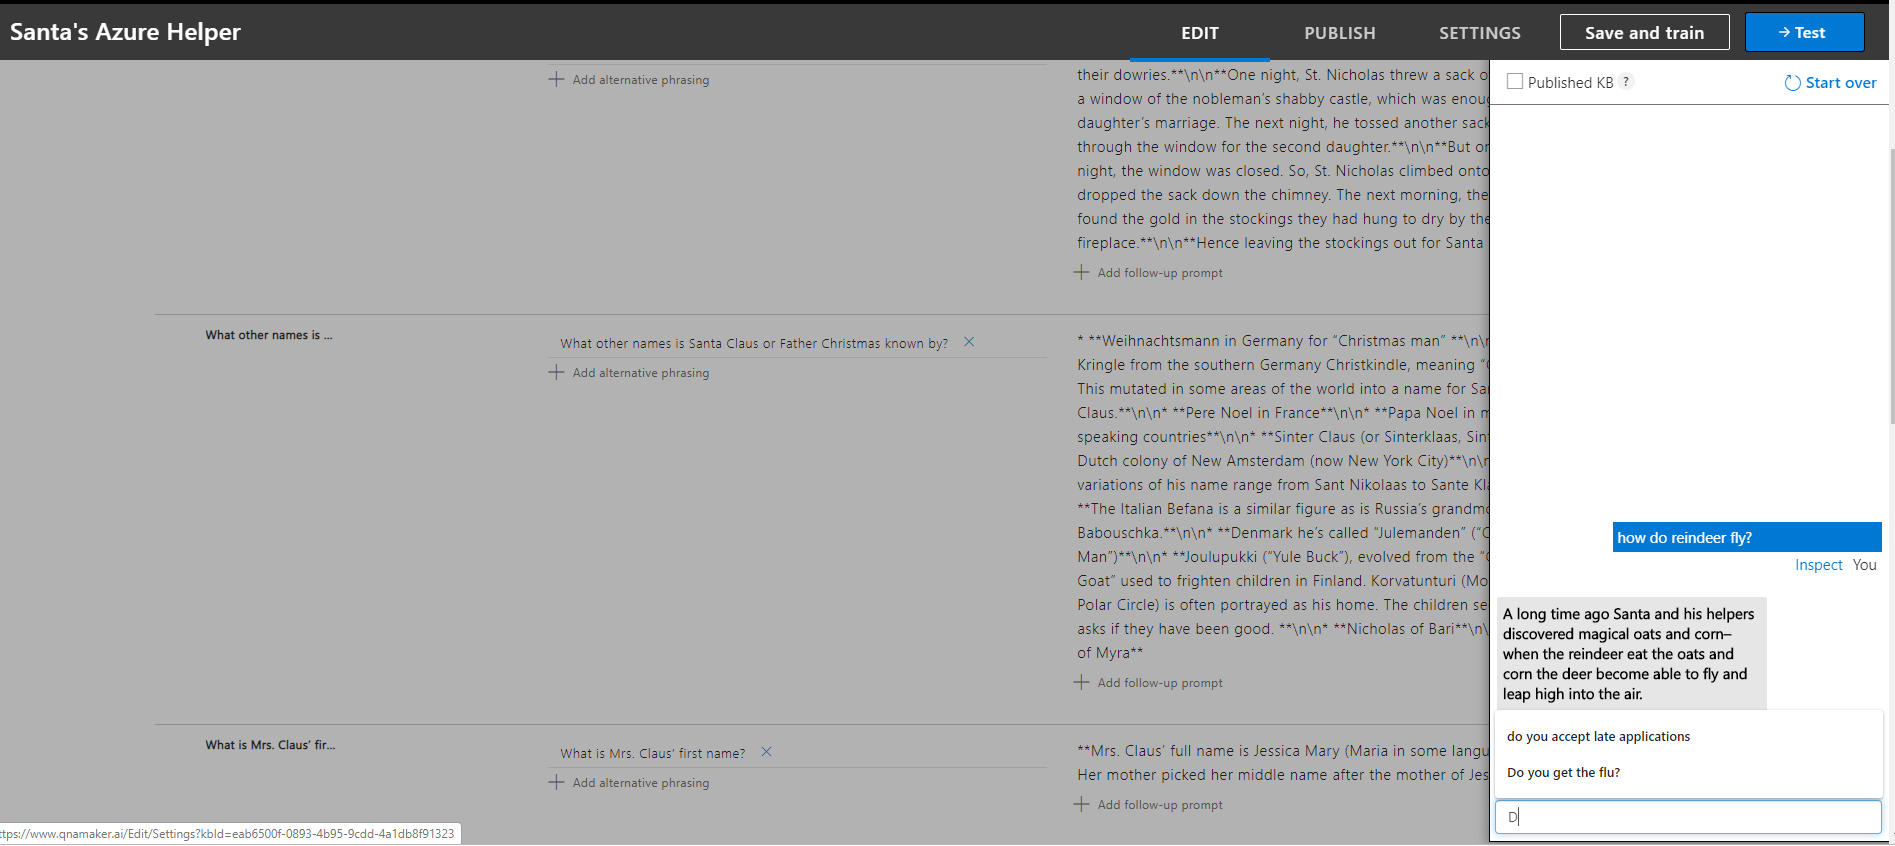
After editing the Knowledge Base sufficiently, clicking Save and Train will save and train the Bot.
To test, click the Test button in the upper right-hand corner. This will open the testing dialog, you can send id a question e.g. how do reindeer fly? and the bot will respond!
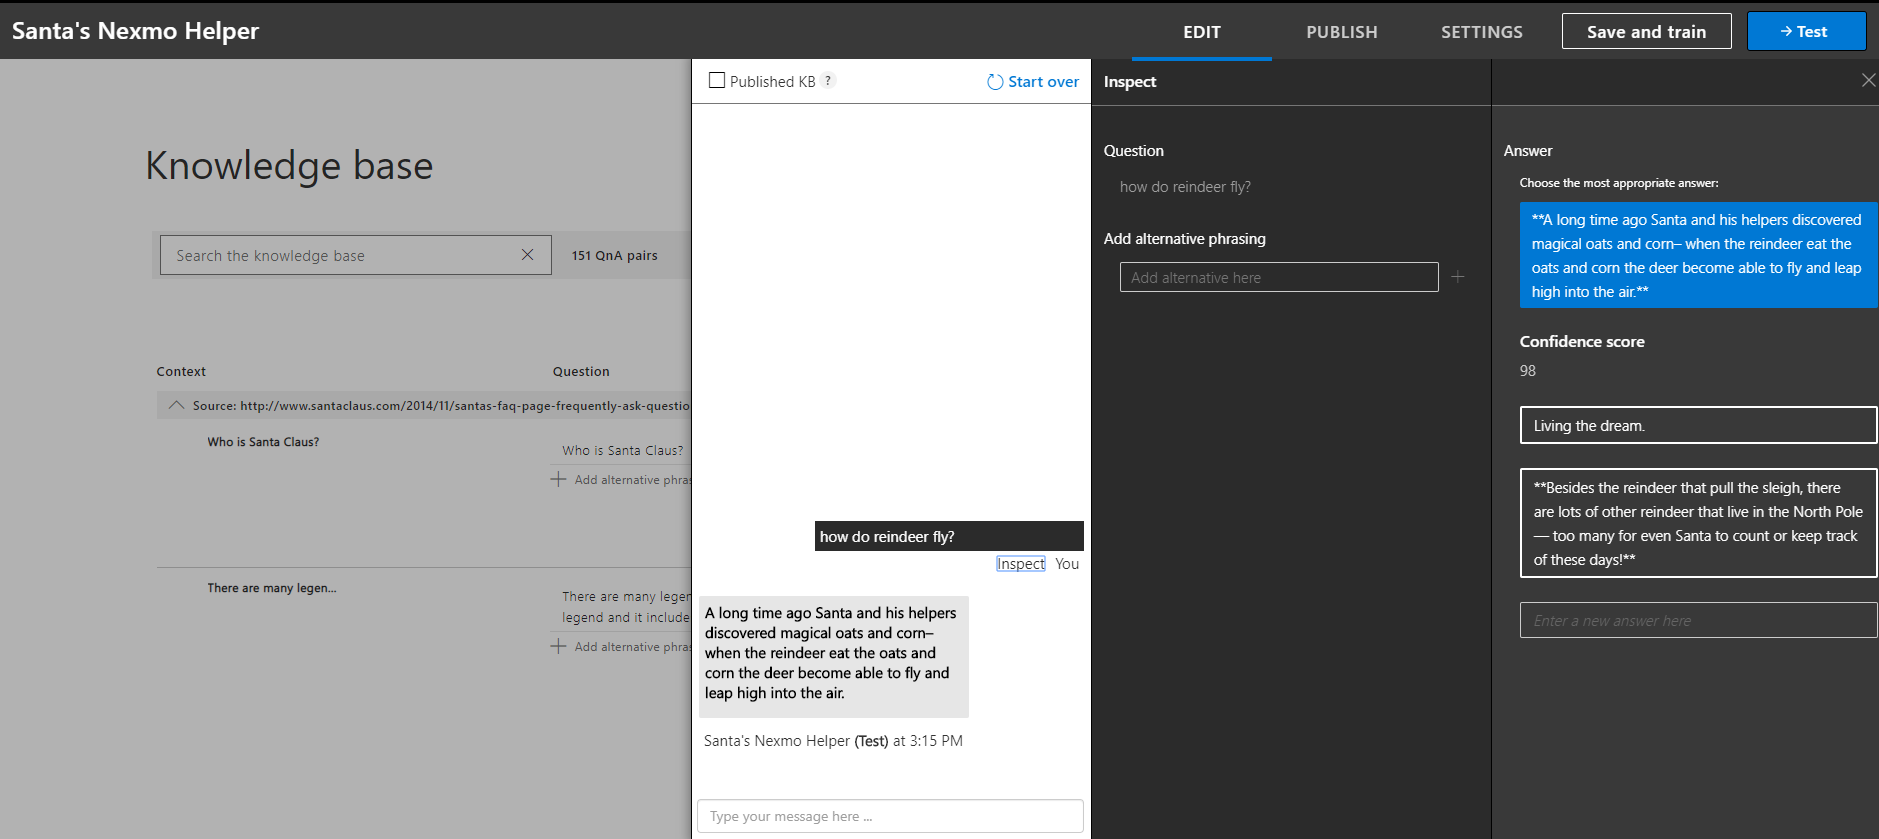
It’s even possible to inspect how the bot made its determination. Click the inspect link and the inspection dialog will pop out. This will show the bot’s confidence in its answer and some alternatives it came up with.
When the bot’s ready to go, click publish on the top of the page, then click publish inside the dialog that shows up. When this completes there will be a screen that pops up with some helpful request structures that can be used to generate an answer from the bot. It’ll look something like:
POST /knowledgebases/YOUR\_KNOWLEDGE\_BASE\_ID/generateAnswerHost: https://nexmofaqbot.azurewebsites.net/qnamakerAuthorization: EndpointKey YOUR\_KNOWLEDGE\_BASE\_ENDPOINT\_KEYContent-Type: application/json{"question":"YOUR\_QUESTION"}Save this string—it’s going to be used to create the WebService that will drive our bot over the Messages API.
Building Our App
Start by opening Visual Studio and selecting “Create a New Project.” In the dialog that opens, select an ASP.NET Core Web Application. Name it something like “QnAMakerMessagesDemo.” Select ASP.NET Core 3.0, “Web Application (Model-View-Control)” as the type and click create.
Install NuGet Packages
In Visual Studio go to Tools -> NuGet Package Manager -> Manage NuGet Packages for Solution.
Install the following NuGet packages:
- Newtonsoft.Json
- Nexmo.Csharp.Client
- BouncyCastle
- jose-jwt
Building Our Token Generator
Create a class called TokenGenerator and add the following code to it:
public static string GenerateToken(IConfiguration config){ // retrieve appID and privateKey from configuration var appId = config["Authentication:appId"]; var priavteKeyPath = config["Authentication:privateKey"]; string privateKey = ""; using (var reader = File.OpenText(priavteKeyPath)) // file containing RSA PKCS1 private key privateKey = reader.ReadToEnd(); //generate claims list const int SECONDS\_EXPIRY = 3600; var t = DateTime.UtcNow - new DateTime(1970, 1, 1); var iat = new Claim("iat", ((Int32)t.TotalSeconds).ToString(), ClaimValueTypes.Integer32); // Unix Timestamp for right now var application\_id = new Claim("application\_id", appId); // Current app ID var exp = new Claim("exp", ((Int32)(t.TotalSeconds + SECONDS\_EXPIRY)).ToString(), ClaimValueTypes.Integer32); // Unix timestamp for when the token expires var jti = new Claim("jti", Guid.NewGuid().ToString()); // Unique Token ID var claims = new List<Claim>() { iat, application\_id, exp, jti }; //create rsa parameters RSAParameters rsaParams; using (var tr = new StringReader(privateKey)) { var pemReader = new PemReader(tr); var kp = pemReader.ReadObject(); var privateRsaParams = kp as RsaPrivateCrtKeyParameters; rsaParams = DotNetUtilities.ToRSAParameters(privateRsaParams); } //generate and return JWT using (RSACryptoServiceProvider rsa = new RSACryptoServiceProvider()) { rsa.ImportParameters(rsaParams); Dictionary<string, object> payload = claims.ToDictionary(k => k.Type, v => (object)v.Value); return Jose.JWT.Encode(payload, rsa, Jose.JwsAlgorithm.RS256); }}This will generate the JWT that’s needed to authenticate against the Messages App created as part of the prerequisites.
Add appId and the Private Key Path to the Configuration
The JWT generator calls on an appId and path to the private key saved earlier to be in the appsettings.json file.
Open this file and add the following to the configuration object:
"Authentication": { "appId": "NEXMO\_APPLICATION\_ID", "privateKey": "C:\\Path\\to\\Private\\key.key" }Build Data Structures to Receive and Send Data
A couple of POCO’s are needed for this demo; they’re a tad verbose, and don’t do anything except define the messages objects per the spec, so the full structure is omitted from this post. Simply add the following classes to the project:
InboundMessage.cs
MessageRequest.cs
Send Messages
With the structures sorted the next step is to send messages across the Nexmo messages API. Create a class called MessageSender, this will have a single static method SendMessage which will simply create a Message Request, create a JWT, create a request, and send the request to the Messages API—it should look something like this:
public static void SendMessage(string message, string fromId, string toId, IConfiguration config, string type){ const string MESSAGING\_URL = @"https://api.nexmo.com/v0.1/messages"; try { var jwt = TokenGenerator.GenerateToken(config); //construct message Request var requestObject = new MessageRequest() { to = new MessageRequest.To() { type = type }, from = new MessageRequest.From() { type = type }, message = new MessageRequest.Message() { content = new MessageRequest.Message.Content() { type = "text", text = message } } }; //special messenger request formatting (use to/from id rather than number, set category to RESPONSE) if (type == "messenger") { requestObject.message.messenger = new MessageRequest.Message.Messenger() { category = "RESPONSE" }; requestObject.to.id = toId; requestObject.from.id = fromId; } else { requestObject.to.number = toId; requestObject.from.number = fromId; } //Generate Request payload from requestObject var requestPayload = JsonConvert.SerializeObject(requestObject, new JsonSerializerSettings() { NullValueHandling = NullValueHandling.Ignore, DefaultValueHandling = DefaultValueHandling.Ignore }); //build request var httpWebRequest = (HttpWebRequest)WebRequest.Create(MESSAGING\_URL); httpWebRequest.ContentType = "application/json"; httpWebRequest.Accept = "application/json"; httpWebRequest.Method = "POST"; httpWebRequest.PreAuthenticate = true; httpWebRequest.Headers.Add("Authorization", "Bearer " + jwt); using (var streamWriter = new StreamWriter(httpWebRequest.GetRequestStream())) { streamWriter.Write(requestPayload); } //handle response using (var httpResponse = (HttpWebResponse)httpWebRequest.GetResponse()) { using (var streamReader = new StreamReader(httpResponse.GetResponseStream())) { var result = streamReader.ReadToEnd(); Console.WriteLine(result); Console.WriteLine("Message Sent"); } } } catch (Exception e) { Debug.WriteLine(e.ToString()); }}Ask the Bot a Question and Send a Response
Now it’s time to talk to the FAQ bot from the app. This is where the sample REST calls that QnAMaker presented earlier will come into play. Recall this string from earlier.
POST /knowledgebases/YOUR\_KNOWLEDGE\_BASE\_ID/generateAnswerHost: https://AZURE\_APP\_NAME.azurewebsites.net/qnamakerAuthorization: EndpointKey YOUR\_KNOWLEDGE\_BASE\_ENDPOINT\_KEYContent-Type: application/json{"question":"YOUR\_QUESTION"}Use that string to create some useful constants/readonly’s for the Questioner—fill in with appropriate values from the string above:
//TODO: fill in with Knowledgebase IDconst string kb\_id = "YOUR\_KNOWLEDGE\_BASE\_ID";//TODO: fill in with Knowledgebase Endpoint keyconst string ENDPOINT\_KEY = "YOUR\_KNOWLEDGE\_BASE\_ENDPOINT\_KEY";const string QUESTION\_FORMAT = @"{{'question': '{0}'}}";//TODO fill in base urlstatic readonly string URI = $"https://AZURE\_APP\_NAME.azurewebsites.net/qnamaker/knowledgebases/{kb\_id}/generateAnswer";Next, create a task to ask the question:
public static async Task<string> RequestAnswer(string question){ using (var client = new HttpClient()) using (var request = new HttpRequestMessage()) { request.Method = HttpMethod.Post; request.RequestUri = new Uri(URI); var formatted\_question = string.Format(QUESTION\_FORMAT, question); request.Content = new StringContent(formatted\_question, Encoding.UTF8, "application/json"); request.Headers.Add("Authorization", "EndpointKey " + ENDPOINT\_KEY); var response = await client.SendAsync(request); var jsonResponse = await response.Content.ReadAsStringAsync(); JObject obj = JObject.Parse(jsonResponse); var answer = ((JArray)obj["answers"])[0]["answer"]; return answer.ToString(); }}This simply formats the question from the messages API and sends the request off as a generateAnswer post request to the QnAMaker bot.
Finally, create a method to drive the request and reply with an answer.
public static async Task AskQuestion(string to, string from, string type, string question, IConfiguration config){ question = HttpUtility.JavaScriptStringEncode(question); var response = await RequestAnswer(question); MessageSender.SendMessage(response, from, to, config, type);}Build Controller to Receive Incoming Messages
The final piece of the puzzle is the controller that will handle the influx of messages from the Messages API. Create an empty MVC controller called MessagesController.
Dependency Injection and Configuration
Add an IConfiguration field called _config to this and set up Dependency injection of configuration by creating a controller constructor taking an IConfiguration object:
private IConfiguration \_config;public MessagesController(IConfiguration config){ \_config = config;}Status Request
Next create a Status Post request that simply returns no content:
[HttpPost]public HttpStatusCode Status(){ return HttpStatusCode.NoContent;}Inbound Messages
Next, add a Post Request for inbound messages from the Messages API.
This method will extract the inbound message from the body, then forward on the Questioner tasks from the content of the request body.
[HttpPost]public HttpStatusCode Inbound([FromBody]InboundMessage message){ Debug.WriteLine(JsonConvert.SerializeObject(message)); if (message.from.type == "messenger") { \_ = Questioner.AskQuestion(message.from.id, message.to.id, message.from.type, message.message.content.text, \_config); } else { \_ = Questioner.AskQuestion(message.from.number, message.to.number, message.from.type, message.message.content.text, \_config); } return HttpStatusCode.NoContent;}Inbound SMS
Finally, add an HttpGet request to manage the inbound SMS messages. This will similarly extract the needed information from the inbound message and ask the question of the questioner.
[HttpGet]public HttpStatusCode InboundSms([FromQuery] SMS.SMSInbound inboundMessage){ \_ = Questioner.AskQuestion(inboundMessage.msisdn, inboundMessage.to, "sms", inboundMessage.text, \_config); return HttpStatusCode.NoContent;}With this sorted, the service is ready for deployment.
Testing
The last thing needed is to fire up the service, expose it to the internet, and wire up the Nexmo Messages App to send webhooks to the service.
IIS Express Configuration
For simplicity this demo uses IIS. To make setting up ngrok easier disable SSL for IIS Express by going into the project Debug properties and unchecking the “Enable SSL” setting:
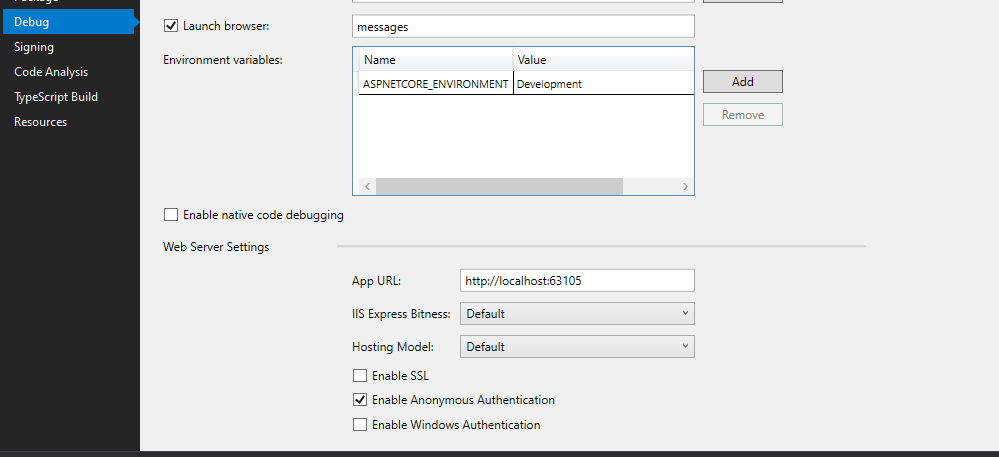
Take note of the port number in the app URL field, it will be used in the next step.
Setting up Ngrok
The next step is to expose this endpoint to the internet. For this demo, something like ngrok can be used to create a tunnel back to the IIS Express port. After installing ngrok use a command like:
ngrok http --host-header="localhost:PORT\_NUMBER" http://localhost:PORT\_NUMBERTo set up the tunnel, replace ‘PORT_NUMBER’ with the IIS Express port number noted earlier. This will create an output that looks something like this:
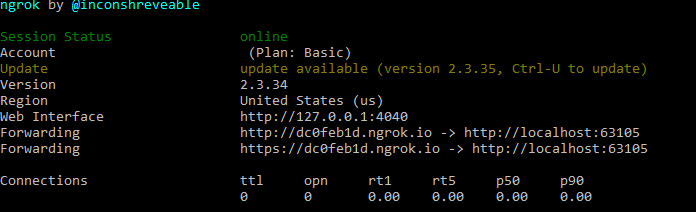
Take note of the http base url here—in the image above the base url is http://dc0feb1d.ngrok.io.
Configuring webhooks
The final step before turning the service on is to configure the webhooks to callback into the service.
Inbound SMS
Go do the Nexmo Dashboard and go to Settings. Set the Inbound Messages URL for SMS to the ngrok_baseurl/messages/InboundSms, given the example above.
http://dc0feb1d.ngroke.io/messages/InboundSmsOther Inbound Messages
In the Nexmo Dashboard open Messages and Dispatch -> Your Applications. Open the application associated with the linked accounts, and click ‘Edit’. Under Capabilities in the Messages section, set the Inbound URL and Status URL to match the ngrok baseurl /Messages/Inbound and /Messages/Status respectively and click save.
Per the example ngrok tunnel it will look something like:
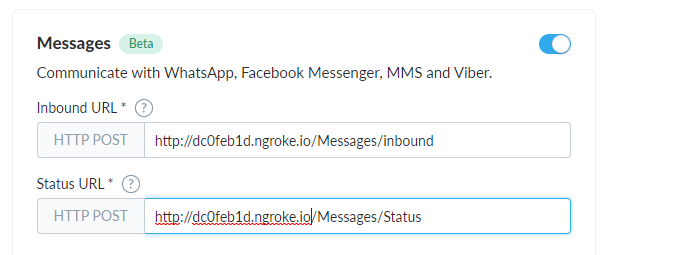
NOTE: The 8 characters preceding ngrok.io are not fixed on the free tier. This means every time the ngrok command is run it will be necessary to change where the webhooks are aiming. It’s possible to create a static hostname by upgrading to a paid ngrok tier.
Fire It Up and Test
And that’s it! Santa’s Nexmo Helper is ready to deploy. Fire up IIS Express and message away. This can be reached over any channel configured to reach the messages app.
Here’s an example from Facebook:
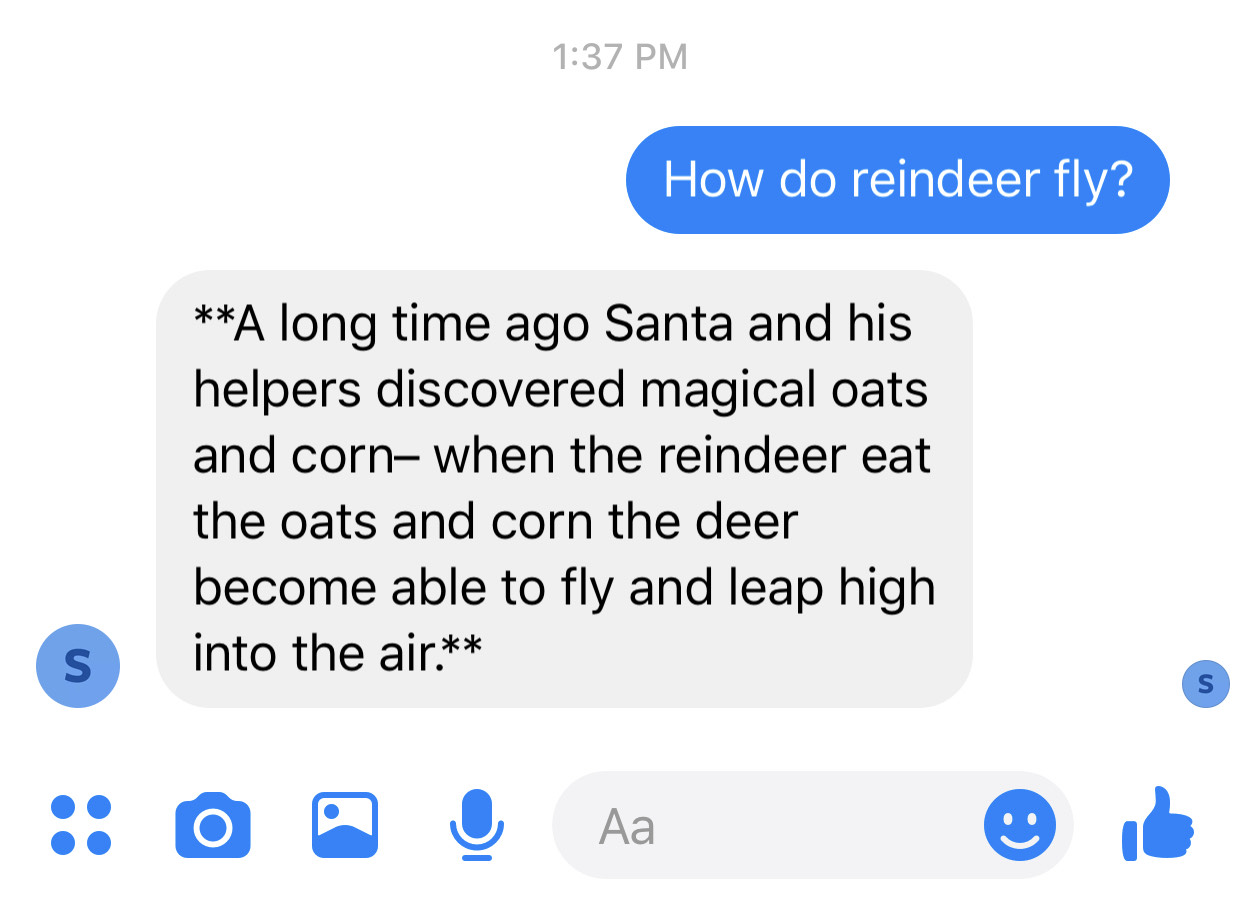
And one from SMS:

Well, there it is, Santa’s Nexmo Helper is up and operational.
Further reading
- Full source code for this demo can be found in GitHub
- For more info on QnAMaker check out their website here
- For fully interactive bots check out Luis Ai
- For more information on the Nexmo Messages API, check out the documentation on Nexmo Developer
- For more APIs by Nexmo check out our Developer site
- To check out the Nexmo .NET SDK you can take a look at out our GitHub Repo
The post Santa’s Nexmo Helper – C# Advent Series appeared first on Nexmo Developer Blog.