Simulate a Stock Exchange with Blazor WebAssembly.
If you followed my previous post on the Order Book and Basic Market Mechanics, you’re primed and pumped for this post. We’re going to be building a market simulator that keeps track of the Order Book of a Stock Exchange. We’ll do this with a combination of .NET technologies including Blazor WebAssembly, Entity Framework Core, and SignalR Core.
Jump Right to the Code
Don’t have time to run through the whole tutorial? That’s fine, all the source code is available in GitHub
Getting Started
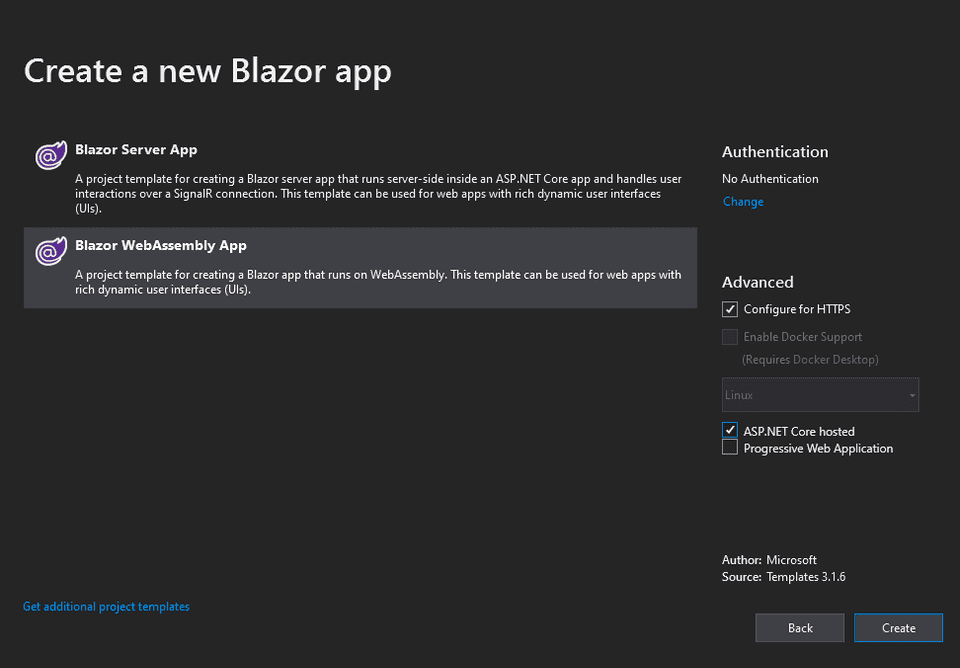
Let’s go ahead and Open Visual Studio, I’m using 2019 for this demo, click “Create a new project” -> Blazor App -> Give the Project a Name and click Create -> Select Blazor WebAssembly App and check the ASP.NET Core hosted and click Create:
Add Dependencies
After Creating the app, there will be three separate projects.
- ProjectName.Client, the WebAssembly
- ProjectName.Server, your server code
- ProjectName.Shared, the shared code in your app
Add the following to each project, respectively, using your preferred means of installing NuGet packages.
Client
- Microsoft.AspNetCore.SignalR.Client
Shared
- System.ComponentModel.Annotations
Server
- Microsoft.EntityFrameworkCore.Design
- Microsoft.EntityFrameworkCore.Sqlite (You can use any Entity database type you like)
- Newtonsoft.Json
- Microsoft.AspNetCore.SignalR.Core
Build Our Model
We are going to write our model into our Shared project. Add the following cs files to your shared project.
- BuySell.cs
- LimitMarket.cs
- Order.cs
Add BuySell Enum
If you’ll recall from my previous post, there’s two transaction types, Buys and Sells. We’re going to represent that in our model in an Enum. Open BuySell.cs and convert its type to the following enum.
public enum BuySell
{
    Buy = 1,
    Sell = 2
}
Add LimitMarket Enum
Similarly, we need to add an enum representing whether the order type is a limit order or market order. Open LimitMarket.cs and change its type to the following.
public enum LimitMarket
{
    Limit=1,
    Market=2
}
Build the Order Class
As we’ve discussed, there are five components of a transaction:
- Transaction Type: Buy/Sell
- Symbol: The ordered security
- Shares: The transacted number of shares
- Order Type: Limit / Market - determining whether the order will have a threshold
- Price: For Limit Orders, the threshold price
We’re going to model this along with some other metadata in an Order Class:
public class Order
{
    [Key]
    public int OrderId { get; set; }
    public BuySell BuyOrSell { get; set; }
    public LimitMarket LimitOrMarket { get; set; }
    public string Symbol { get; set; }
    public int NumSharesRemaining { get; set; }
    public int NumSharesInital { get; set; }
    public double Price { get; set; }
    public string TimePlaced { get; set; }
    public double FillPrice { get; set; }
}
Create Database
With our data modeled we will move to the Server project. Add a class OrderContext to the Server Project. It will inherit DbContext from Microsoft.EntityFrameworkCore. Add a DbSet to contain our Orders, and override the config to use sqlite and use the database OrderBook.db.
public class OrderContext : DbContext
{
    public DbSet<Order> Orders { get; set; }
    protected override void OnConfiguring(DbContextOptionsBuilder options)
    => options.UseSqlite("Data Source=OrderBook.db");
}
Now run the following in your console from within the server directory.
dotnet tool install --global dotnet-ef
dotnet ef migrations add InitialCreate
dotnet ef database update
Note: I’ve seen the migrations uninstall packages from my project if that happens to you just reinstall them and run it again
This operation will output OrderBook.db in our server project’s directory.
Add OrderHub
We are going to use a single Hub to push everything down for us. In the server project, create a new Directory called Hubsand add an OrderHub class. Declare the OrderHub class as public and have it extend the Hub class from SignalR:
public class OrderHub : Hub{}Configure Middleware
Now that we have our database and our hub, we need to configure the middleware for our app. In the server project open startup.cs, in the ConfigureServices method add SignalR and the DbContext:
services.AddSignalR();
services.AddDbContext<OrderContext>();
Next, in the UseEndpoints delegate in the Configure method, map the hubs path.
app.UseEndpoints(endpoints =>
{
    endpoints.MapRazorPages();
    endpoints.MapControllers();
    endpoints.MapFallbackToFile("index.html");
    endpoints.MapHub<OrderHub>("/orderhub"); //Add this line
});
Build our Controller
Next, we’re going to build the controller for our server; this will manage the book for us. Right Click on Controllers -> add -> Controller. Add an Empty API controller and call it OrderController. Delete any route information that comes as boilerplate - your class deceleration should look like:
[ApiController]
public class OrderController : ControllerBase
Dependency Injection and Construct Controller
We’re going to need access to our Database and our Order Hub in this controller so let’s go ahead and inject them into the constructor:
private readonly OrderContext _orderContext;
private readonly IHubContext<Hubs.OrderHub> _hubContext;

public OrderController(OrderContext orderContext, IHubContext<Hubs.OrderHub> hubContext)
{
    _orderContext = orderContext;
    _hubContext = hubContext;
}
Get Pending Orders
We’re going to classify orders into two types, Pending and Filled Let’s build the operation now for Getting Pending orders. If the Order still has unfilled shares, it is pending. So we’re going to take a symbol and transaction type and get orders based on their symbol and transaction type. We’ll order by price, ascending for sell and descending for buy.
[HttpGet]
[Route("[controller]/getPendingOrders")]

public ActionResult<IEnumerable<Order>> GetPendingOrders(string symbol, string type)
{
    var buySell = (BuySell)Enum.Parse(typeof(BuySell), type);
    if(buySell == BuySell.Sell)
    {
        return _orderContext.Orders
            .Where(o => o.BuyOrSell == buySell && o.Symbol == symbol && o.NumSharesRemaining > 0)
            .OrderBy(o => o.Price).ToList();
    }
    else
    {
        return _orderContext.Orders
            .Where(o => o.BuyOrSell == buySell && o.Symbol == symbol && o.NumSharesRemaining > 0)
            .OrderByDescending(o => o.Price).ToList();
    }
}
Get Filled Orders
We will not distinguish the transaction type of symbol for filled orders, so let’s create a controller method that returns all records in our database where the number of shares remains 0.
[HttpGet]
[Route("[controller]/getFilledOrders")]
public ActionResult<IEnumerable<Order>> GetFilledOrders()
{
    return _orderContext.Orders.Where(o => o.NumSharesRemaining == 0).ToList();
}
Get Symbols
We’re going to want to tell our frontend what symbols are available for trade to this end. Let’s just get the distinct list of order symbols.
[HttpGet]
[Route("[controller]/getsymbols")]
public ActionResult<List<string>> GetSymbols()
{
    return _orderContext.Orders.Select(o => o.Symbol).Distinct().ToList();
}
Process an Order
This operation is the meat of what we’ll be doing in our controller. We will get an order from the body of the request.
[HttpPost]
[Route("[controller]/placeOrder")]
public async Task<ActionResult<Order>> PlaceOrder([FromBody]Order order)
Then we’ll need to create a set of candidate orders and a List of orders to update after our transaction.
IEnumerable<Order> candidateOrders;
List<Order> updatedOrders = new List<Order>();
After that, let’s get all the candidate orders. If the Order is a market order, we will get all orders matching the symbol and order them by Price, ascending for Buys, and descending for Sells. For limit orders, we will get all orders at or above the Sell price or at or below the Buy price using the same ordering schemes.
if(order.LimitOrMarket == LimitMarket.Market)
{
    if(order.BuyOrSell == BuySell.Buy)
    {
        candidateOrders = _orderContext.Orders
            .Where(o => o.BuyOrSell == BuySell.Sell && o.NumSharesRemaining > 0 && o.Symbol == order.Symbol)
            .OrderBy(o => o.Price).ThenBy(o => order.NumSharesRemaining);
    }
    else
    {
        candidateOrders = _orderContext.Orders
            .Where(o => o.BuyOrSell == BuySell.Buy && o.NumSharesRemaining > 0 && o.Symbol == order.Symbol)
            .OrderByDescending(o => o.Price).ThenBy(o => o.NumSharesRemaining);
    }
}
else
{
    if(order.BuyOrSell == BuySell.Buy)
    {
        candidateOrders = _orderContext.Orders
            .Where(o => o.BuyOrSell == BuySell.Sell && o.NumSharesRemaining > 0 && o.Price <= order.Price && o.Symbol == order.Symbol)
            .OrderBy(o => o.Price).ThenBy(o => order.NumSharesRemaining); ;
    }
    else
    {
        candidateOrders = _orderContext.Orders
            .Where(o => o.BuyOrSell == BuySell.Buy && o.NumSharesRemaining > 0 && o.Price >= order.Price && o.Symbol == order.Symbol)
            .OrderByDescending(o => o.Price).ThenBy(o => order.NumSharesRemaining);
    }
}
Next, we will go ahead and transact. At the same time, while the order still has unfilled shares, we will pull the candidate orders in order and draw their shares down appropriately. We update the fill price for both the candidate and the incoming order appropriately. We will also update our database entry for the candidate.
foreach (var candidate in candidateOrders)
{
    int numSharesToTrade;
    if(candidate.NumSharesRemaining>=order.NumSharesRemaining)
    {
        numSharesToTrade = order.NumSharesRemaining;
    }
    else
    {
        numSharesToTrade = candidate.NumSharesRemaining;
    }
    candidate.NumSharesRemaining -= numSharesToTrade;
    order.NumSharesRemaining -= numSharesToTrade;
    candidate.FillPrice += numSharesToTrade * candidate.Price;
    order.FillPrice += numSharesToTrade * candidate.Price;
    _orderContext.Update(candidate);
    updatedOrders.Add(candidate);
    if (order.NumSharesRemaining == 0)
    {
        break;
    }
}
Finally, we’ll add the inbound order to our database, and our updated order list. We will then save the changes to our database, and finally, we will send the list of updated orders down to all our clients before finally returning the updated order object.
updatedOrders.Add(order);
_orderContext.Add(order);
_orderContext.SaveChanges();
await _hubContext.Clients.All.SendAsync("updateOrders", updatedOrders);
return order;
Build Frontend
All that’s left to do now is to build the frontend for our app! As I mentioned, this is all going to be in Blazor WebAssembly!
Disable Caching
First, we’re going to need to load stuff from our controller dynamically, so we’ll need to disable the caching of the HttpClient. Open Program.cs and replace the builder.Services.AddTransient call to:
builder.Services.AddTransient(sp =>
{
    var client = new HttpClient { BaseAddress = new Uri(builder.HostEnvironment.BaseAddress) };
    client.DefaultRequestHeaders.CacheControl = new System.Net.Http.Headers.CacheControlHeaderValue { NoCache = true };
    return client;
});
This operation will set the NoCache header for outbound requests on the HttpClient that we’re going to inject.
Add Pages
Add a PendingOrder.razor and FullfilledOrders.razor pages to the Pages Directory. You can do this by right-clicking on the Pages Directory -> add -> Razor Component.
FullFilled orders Component
The Filled Orders component is going to have a Table that shows all the orders filled. We populate the table in two directions.
- On Load, it will populate by requesting the currently filled orders
- Whenever the orderHub updates it will push a new list of orders down to the page
Bring in Dependencies
First, we’ll need to bring in our dependencies. We’ll set the path of the page to /FilledOrders, add using statements for shared and SignalR, implement the IDisposable pattern and inject the NavigationManager and the HttpClient.
@page "/FilledOrders"
@using MarketMechanicsDemo.Shared
@using Microsoft.AspNetCore.SignalR.Client
@inject NavigationManager NavigationManager
@inject HttpClient Http
@implements IDisposable
Build the Table
Next, we’ll build the table, we’ll give our five core fields, but we will also give it other data, for example, the fill price (the total cost of the order when filled) and the price per share for the final fill. This operation will be populated by looping through the _orders collection we’ll look at in the code next.
<h3>Filled Orders</h3>

<table style="width:80%; max-height:80%; overflow-y:auto">
    <thead class="table-active">
        <tr>
            <th>Order ID</th>
            <th>Transaction Type</th>
            <th>Trade Type</th>
            <th>Symbol</th>
            <th>Order Size</th>
            <th>Price</th>
            <th>Filled Price</th>
            <th>Filled Price Per Share</th>
        </tr>
    </thead>
    <tbody>
        @foreach (var order in _orders)
        {
            <tr>
                <td>@order.OrderId</td>
                <td>@order.BuyOrSell</td>
                <td>@order.LimitOrMarket</td>
                <td>@order.Symbol</td>
                <td>@order.NumSharesInital</td>
                <td>@order.Price</td>
                <td>@order.FillPrice</td>
                <td>@Math.Round(order.FillPrice/(double)order.NumSharesInital,2)</td>
            </tr>
        }
    </tbody>
</table>
Add the Code Section
Now that we’ve got our HTML set, we will need to add the code. We will have a private field for our orders, and the HubConnection is what our server will use to push updates down to us. We will then need to initialize the hubConnection with an update function and populate the orders collection in the OnInitializedAsync task. Finally, we will add our Dispose method at the end.
@code {
    private List<Order> _orders = new List<Order>();
    private HubConnection _hubConnection;
    protected override async Task OnInitializedAsync()
    {
        _hubConnection = new HubConnectionBuilder()
            .WithUrl(NavigationManager.ToAbsoluteUri("/orderhub"))
            .Build();
        _hubConnection.On<IEnumerable<Order>>("updateOrders", (updatedOrders) =>
        {
            var ordersToAdd = updatedOrders.Where(o => !_orders.Select(x => x.OrderId).Contains(o.OrderId) && o.NumSharesRemaining == 0);
            _orders.AddRange(ordersToAdd);
            StateHasChanged();
        });

        _orders = await Http.GetFromJsonAsync<List<Order>>("/order/getFilledOrders");
    }

    public void Dispose()
    {
        _ = _hubConnection?.DisposeAsync();
    }
}
Pending Orders Component
The other component we will need to add is the PendingOrders Component. This component will display the pending orders for particular security at any given time.
Get Dependencies
We are going to set the page path to "/PendingOrders/{IsSell:bool}" we do this so we can pass an isSell parameter in from our NavLinks, aside from that this will be the same as the previous page.
@page "/PendingOrders/{IsSell:bool}"
@using MarketMechanicsDemo.Shared
@using Microsoft.AspNetCore.SignalR.Client
@inject HttpClient Http
@inject NavigationManager NavigationManager
@implements IDisposable
Set Up Code Block
In our @code{} block, we are going to do the following.
Add Fields and Parameters
We will add a boolean, which will indicate whether the page is a buy or sell page - this is to increase the reusability of the page. We will add our Hub Connection and our Orders Collection. We will also have a list of symbols that have pending orders and a selected symbol indicating what our currently chosen symbol is.
public bool _isSell;
[Parameter]
public bool IsSell
{
    get
    {
        return _isSell;
    }
    set
    {
        _isSell = value;
        _ = GetOrders(new ChangeEventArgs { Value = _symbols.FirstOrDefault() });
    }
}

private HubConnection _hubConnection;

private List<Order> _orders = new List<Order>();

private List<string> _symbols = new List<string>();

private string _selectedSymbol;
Add Get Orders Method
We will need a GetOrders method, which will populate the orders whenever someone changes the selected symbol, it will also serve to do the initial population when we initialize everything. It will just fetch the Pending orders from our controller and store it in our _orders collection.
public async Task GetOrders(ChangeEventArgs e)
{
    _selectedSymbol = (string)e.Value;
    Console.WriteLine(_selectedSymbol);
    if (!string.IsNullOrEmpty(_selectedSymbol))
    {
        if (IsSell)
        {
            _orders = await Http.GetFromJsonAsync<List<Order>>($"/order/getPendingOrders?symbol={_selectedSymbol}&type={BuySell.Sell}");
        }
        else
        {
            _orders = await Http.GetFromJsonAsync<List<Order>>($"/order/getPendingOrders?symbol={_selectedSymbol}&type={BuySell.Buy}");
        }
        StateHasChanged();
    }
}
Initialize Logic
Our OnInitializedAsync method will operate similarly to the last pages. Its update logic is a bit more complicated as it has to contend with which orders to update, versus add, versus remove as orders get added, filled, or changed. After setting up the updateOrders logic, it will populate the orders list with its initial list.
protected override async Task OnInitializedAsync()
{
    _hubConnection = new HubConnectionBuilder()
        .WithUrl(NavigationManager.ToAbsoluteUri("/orderhub"))
        .Build();
    _hubConnection.On<IEnumerable<Order>>("updateOrders", (updatedOrders) =>
    {
        try
        {
            var ordersToUpdate = updatedOrders.Where(o => _orders.Select(x => x.OrderId).Contains(o.OrderId) && o.NumSharesRemaining > 0);
            var ordersToAdd = updatedOrders.Where(o => !_orders.Select(x => x.OrderId).Contains(o.OrderId) && o.NumSharesRemaining > 0 && (o.BuyOrSell == BuySell.Sell) == _isSell);
            var ordersToRemove = updatedOrders.Where(o => o.NumSharesRemaining == 0).Select(o => o.OrderId);
            //delete
            _orders = _orders.Where(o => !ordersToRemove.Contains(o.OrderId)).ToList();
            //update
            ordersToUpdate.ToList().ForEach(o =>
            {
                var order = _orders.Where(x => x.OrderId == o.OrderId).First();
                var index = _orders.IndexOf(order);
                _orders[index] = o;
            });
            //add
            _orders.AddRange(ordersToAdd);
            StateHasChanged();
        }
        catch(Exception ex)
        {
            Console.WriteLine(ex.ToString());
        }
    });
    await _hubConnection.StartAsync();
    _symbols = await Http.GetFromJsonAsync<List<string>>("/order/getsymbols");
    StateHasChanged();
    if (_symbols.Any())
    {
        await GetOrders(new ChangeEventArgs { Value = _symbols.First() });
    }

}
Add our View Code
Finally, we need to add the view code to our page - this is going to be similar again to our filled order page in that it’s going to be a table, the only differentiator is that there will be a select box. From which you will select the symbol to display orders. This element has an onchange bound to our GetOrders Method.
@if (IsSell)
{
    <h3>Pending Sale Orders</h3>
}
else
{
    <h3>Pending Buy Orders</h3>
}


<label for="symbolSelect">Choose a Symbol</label>
<select name="symbolSelect" class="custom-select-sm" @onchange="@GetOrders">
    @foreach (var symbol in _symbols)
    {
        <option value="@symbol">@symbol</option>
    }
</select>

<table style="width:80%; max-height:80%; overflow-y:auto" class="table-bordered">
    <thead>
        <tr>
            <th>Transaction Type</th>
            <th>Symbol</th>
            <th>Shares</th>
            <th>Order Type</th>
            <th>Price</th>
            <th>Shares Remaining</th>
        </tr>
    </thead>
    <tbody>
        @foreach (var order in _orders)
        {
            <tr>
                <td>@order.BuyOrSell.ToString()</td>
                <td>@order.Symbol</td>
                <td>@order.NumSharesInital</td>
                <td>@order.LimitOrMarket.ToString()</td>
                <td>@order.Price</td>
                <td>@order.NumSharesRemaining</td>
            </tr>
        }
    </tbody>
</table>
Build or Order Form
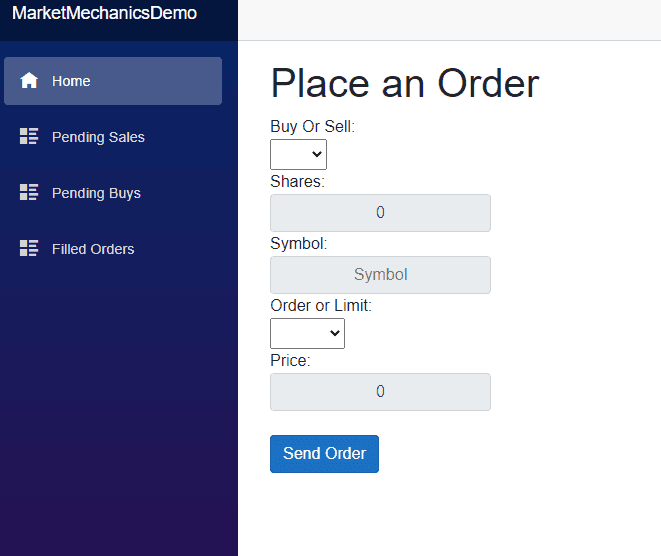
Now we need to build our Order Form. This form will take the five inputs we’ve spoken to before. And when It’s submitted will submit the whole order up to our server. Replace the Index.razor file’s code with:
@page "/"
@using MarketMechanicsDemo.Shared;
@inject HttpClient Http;

<h1>Place an Order</h1>
Buy Or Sell:
<br/>
<select class="custom-select-sm" @bind="@_order.BuyOrSell">
    <option value="@BuySell.Buy">Buy</option>
    <option value="@BuySell.Sell">Sell</option>
</select>
<br />
Shares:
<br />
<input @bind="@_order.NumSharesInital" placeholder="Price" class="input-group-text" />
Symbol:
<br />
<input @bind="@_order.Symbol" placeholder="Symbol" class="input-group-text" />
Order or Limit:
<br />
<select class="custom-select-sm" @bind="@_order.LimitOrMarket">
    <option value="@LimitMarket.Limit">Limit</option>
    <option value="@LimitMarket.Market">Market</option>
</select>
<br />
Price:
<input @bind="@_order.Price" placeholder="Price" class="input-group-text" /><br />
<button class="btn btn-primary" @onclick="SendOrder">Send Order</button>

@if (_lastOrderFilled?.NumSharesRemaining == 0)
{
    <h2>Order Filled!</h2>
}
else if(_lastOrderFilled?.NumSharesRemaining > 0)
{
    <h2>Order Pending</h2>
}

@code{

    private Order _order { get; set; } = new Order();
    private Order _lastOrderFilled;


    public async Task SendOrder()
    {
        _order.NumSharesRemaining = _order.NumSharesInital;
        var response = await Http.PostAsJsonAsync<Order>("/order/placeOrder", _order);
        var json = await response.Content.ReadAsStringAsync();
        _lastOrderFilled = System.Text.Json.JsonSerializer.Deserialize<Order>(json);
        _order = new Order();
        StateHasChanged();
    }
}
Update Nav Links
Now that we have all our components set the last think we’ll need to do is enable our navigation so we can actually get to everything! go to Shared\NavMenu and replace the contents of the div containing the NavLink elements with:
<ul class="nav flex-column">
<li class="nav-item px-3">
    <NavLink class="nav-link" href="" Match="NavLinkMatch.All">
        <span class="oi oi-home" aria-hidden="true"></span> Home
    </NavLink>
</li>
<li class="nav-item px-3">
    <NavLink class="nav-link" href="PendingOrders/true">
        <span class="oi oi-list-rich" aria-hidden="true"></span> Pending Sales
    </NavLink>
</li>
<li class="nav-item px-3">
    <NavLink class="nav-link" href="PendingOrders/false">
        <span class="oi oi-list-rich" aria-hidden="true"></span> Pending Buys
    </NavLink>
</li>
<li class="nav-item px-3">
    <NavLink class="nav-link" href="FilledOrders">
        <span class="oi oi-list-rich" aria-hidden="true"></span> Filled Orders
    </NavLink>
</li>
</ul>
And that’s it!
Testing
Now that we’ve built everything, all that’s left to do is test. You can fire this up in IIS express or kestrel, then navigate to our website the home page will look something like this:
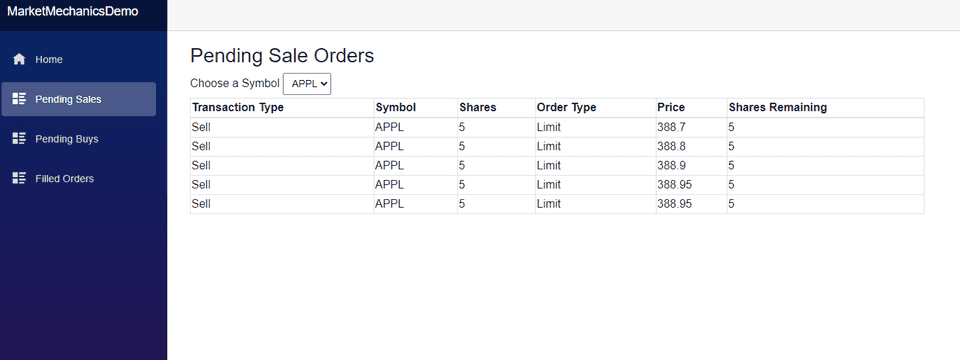
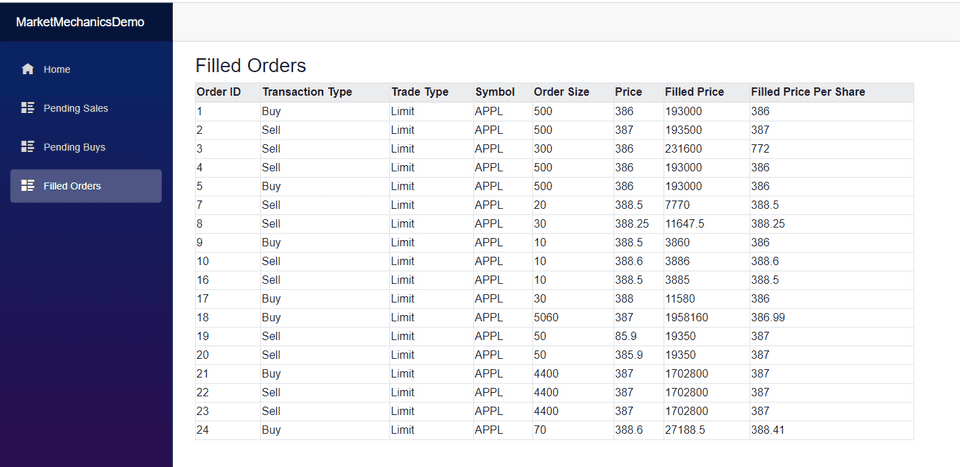
If you open a separate tab/window to pending sales or pending buys page and submit an order, you will see the order come in in real-time, as you add orders that will fill said orders you will see those orders disappear and the filled orders appear in the Filled Orders.
Pending Orders
Filled Orders
Next Steps
Now that we have the means to simulate the core market mechanics, we can start modeling the market. That’s right; this tool can serve as a foundation for beginning to look at the markets scientifically - am I sensing another blog post on technical indicators an ML models? Perhaps I am, tune in to find out!
Resources
- The source code for this demo is available in GitHub.


