SMS Language Understanding with LUIS and .NET
How do you go about getting your user inputs? I bet if you’re building a web app or GUI, you’re probably going to be using some form that your user can fill out and submit. If you’re writing a console app, you’re going to have some coded series of inputs and flags that your user is going to give you. What if you wanted to take in a message, say an SMS, from a user and parse out actionable information from that SMS?
Take this sentence, as an example:
I'd like to have one cheese pizza from Joe's Pizza delivered to 21 Jump Street, Melbourne, FL 32940.Imagine collecting that information in a web form.
Quantity: 1Item: PizzaToppings: cheeseRestaurant: Joe's PizzaMethod: Deliverystreet-number: 21street-name: Jump StreetCity: MelbourneState: FLZip: 32940But of course, since this phrase isn’t structured, it’s impossible to extract this information out of it. That’s where Microsoft’s Language Understanding (LUIS) comes in. With LUIS, we can build bots that allow us to use natural language as an input and understand the intent of the user even from these phrases. And that is what we are going to learn in this post—how to build natural language understanding using LUIS and using that language recognition to handle input from SMS.
Prerequisites
- A Vonage API account
- Visual Studio or Rider (I’m using Visual Studio 2019)
- The .NET Core 3.1 runtime
- A LUIS Account
- Optional: ngrok to test
Some Important Concepts in LUIS AI
LUIS looks at all inputs as ‘utterances’, or things you might say. There are two key concepts that you need to understand to get up and running with LUIS. The first is intents. The intent is the objective of the utterance—so in our example, you might call that intent ‘OrderFood.’ The second concept is entities, which are specific pieces of information passed along through our utterances, which could correspond to the data in a form.
Using these core concepts, you can detect the intent of your user, almost like you’re routing the request to an endpoint. Then you can pull out the information your user is giving you for usage in your app.
Building LUIS Apps
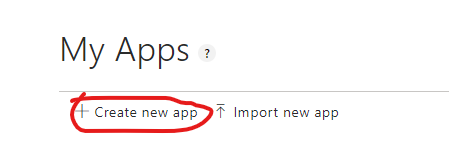
Let’s start by going to the LUIS application page.
From here, create an app by clicking Create app. Let’s name it DeliverySample.
After creating your app, you’ll be redirected to your app’s dashboard. Click Build in the tab bar up top:
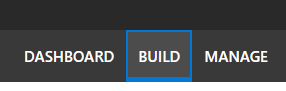
This will bring you to the builder interface. Now there are two ways to build your Luis app—via the API, or with the GUI. We’re just going to learn how to do it with the GUI.
Add Some Entities
Address Entity
To add some entities to our app, we go to App Assets -> Entities. We’ll start by creating an Address Entity. Since an address decomposes to several components, we’ll start by adding the component entity types. First, click Create new Entity and create a simple type called StreetNumber. Repeat this for StreetName, City, State, and ZipCode. Finally, we can create the composite entity. Click Create New Entity again, select type composite, and add each of the types we just created as children of that type.
Method Entity
You can now create other entities as well—for example, a ‘Method’ entity describing how the user is going to get the food. In this, the age of COVID-19, we only have two options: take-out or delivery. Thus, we’ll create Method as a List entity (an entity with an enumerated list of values), and those values we can provide synonyms for, e.g., ‘take away’ or ‘dropped off.’
Adding a Food entity
We can also add a food entity. For this, let’s add another simple entity and call it food.
Bring in a Domain-Simple Entity
The last entity we’ll add will be the PlaceName Domain-Simple entity. Click Add prebuilt domain entity and find RestaurantReservation.PlaceName. These prebuilt entities come along with hundreds of pre-trained utterances. Thus, they do a fair job of understanding what a place name looks like in context. Regardless, we’ll need to train LUIS to understand these a little better as it’s going to be looking at restaurant names from a different perspective.
Adding our Intent
Intents in LUIS are what the utterance you’re providing it is asking for or saying. So in our example, we can read the ‘intent’ of the phrase as OrderFood. So let’s do just that. Go to App Assets -> Intents. This page is the list of intents your app looks for. Every LUIS app understands a ‘None’ intent, which is the “I don’t know” intent that it registers when it can’t make out what the utterance is saying. Let’s add our example ‘OrderFood’ intent.
Add Utterances to OrderFood Intent
With our intent created, we need to populate the intent with utterances. Populating these utterances enables LUIS to recognize the intent and extract the data from it. The recommendation from Microsoft is that any real-world intent is going to need a minimum of 15 utterances of different lengths, structures, and tenses before LUIS can begin to predict and extract information accurately.
To add utterances to an intent, click into the intent, bringing you to the intent’s page. On this page, there is a section that says ‘Enter an example of what a user might say and hit Enter.’ Follow those instructions to enter an utterance. Here’s some that I started with:
- I’d like an order of disco fries sent to 14 Seventh Ave, New York New York, 10001
- Can I get a chicken burrito from Chipotle delivered to 15 Yemen Road, Cedar Rapids Iowa, 52227
- I’d like to pick up a General Tsao’s Chicken from Hop Bo’s
Labeling Entities
What we just did will allow LUIS to extract user intent from those phrases. But that’s only half of what makes LUIS powerful. Where LUIS gets powerful is that it allows you to extract data directly from user utterances using the entities we defined earlier. But, in order for it to do that, you must first label the entities within the utterances to have them identified. To do that, click on the individual words within the utterance that are relevant to the entity. See how I did it in the GIF below.
Testing our Intents
With the 3 or so entities that we’ve entered and marked so far, we can now go about actually playing with LUIS to see how it does (hint: it won’t do great with only 3 utterances). Click the train button on the upper right-hand corner of the screen. This makes LUIS train against all the entities/intents/utterances you’ve provided it thus far.
When Luis finishes training, you can test it in the web interface. Click the Test button, which will pop out the chat window. Click the arrow button on the top right to expand the details pane. Now we can enter phrases and see what LUIS does. I’ll start with “Send chicken wings to 7287 North Cottage Ave. Camden, NJ 08105 from Popeye’s.” This is going to perform quite poorly because LUIS hasn’t seen anything structured quite this way yet. So we can pop out the detail pane and edit the intent so that it reflects what the intent should have been. Setting the intent in the details pane will push that utterance into the list of utterances for that intent. From there, we can mark the different entities from the intent.
Adding Patterns
If you look at the phrase “Send chicken wings to 7287 North Cottage Ave. Camden, NJ 08105 from Popeye’s” with all the entities highlighted it’ll look like this:

This forms something called a pattern, which is almost like a regex to LUIS. You can add this as a pattern by checking the box next to the utterance, and clicking ‘add as pattern’ at the top. After doing this, hit train again to get LUIS to incorporate the new utterance and the pattern to its model.
Extracting Entities from Query’s
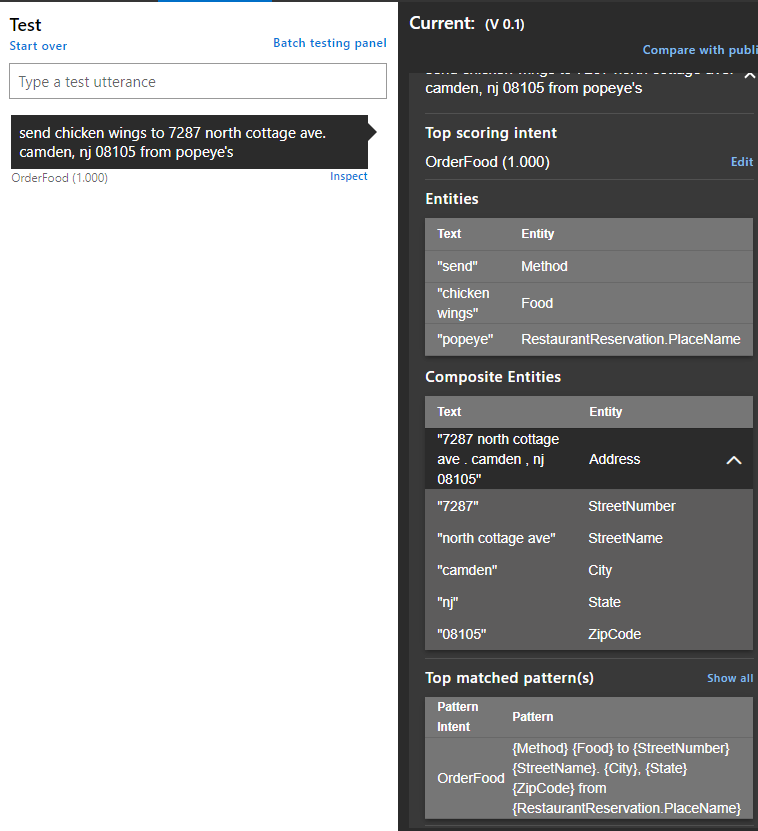
Now that we’ve trained LUIS a bit better, let’s again pass it “Send chicken wings to 7287 North Cottage Ave. Camden, NJ 08105 from Popeye’s.” This is going to produce a substantially different result. For one thing, now it’s 100% sure that the intent was to order food. Also, more significantly, in addition to determining the intent of the utterance, it’s extracted useful information from the utterance. For instance, we know that the method is ‘Send’, which is part of the delivery sub-list, therefore we know they want the chicken wings delivered. We know the food they want is “Chicken Wings.” We know they want the chicken wings from Popeye’s, and we know where to deliver it! When we query this later from our C# app, we’re going to see that the data comes back to us in a JSON object that we’ll be able to parse easily.
Publishing the Demo
To publish your LUIS app, just hit the publish button in the top right of the screen, select the Production radio button, and follow the instructions. You may want to enable Bing spell check or perhaps even sentiment analysis if you want to pull sentiment off of the requests. This will publish the app to an Azure endpoint—take note of the Primary Key, the Endpoint Url, and of course, your AppId in the Azure Resources and Application Information Pages. You’ll need them later.
Building our .NET app
For this demo, we’re going to create a simple inbound/outbound SMS API app in ASP.NET Core. So let’s fire up Visual Studio:
- Click Create New
- ASP.NET Core Web Application
- Name it
LuisVonageDemo - Click Create
- Select API for the type
- Click Create
- Add a new Class
LuisQuery - Right-click the Controllers Directory and go to Add -> Controller, create a new API Controller -> Empty
SmsController - Add a new class called
Dispatcherto the project
Add Packages
Add the following packages to the project:
- Microsoft.Azure.CognitiveServices.Language.LUIS.Runtime (I’m using 3.0.0)
- Nexmo.Csharp.Client (I’m using 4.3.1)
Add Environment Variables
You can decide how you’re going to get your credentials into your app. I like to use either configuration dependency injection or environment variables. Using environment variables is a bit simpler in this instance, so we’ll go ahead and use that for the demo. Right-click on the project and go to properties. In the Debug tab, scroll down to environment variables and add the following:
| Variable | Description |
|---|---|
| NEXMO_API_KEY | Your API Key from the dashboard |
| NEXMO_API_Secret | Your API Secret from the dashboard |
| LUIS_PREDICTION_KEY | This is the key from LUIS |
| LUIS_ENDPOINT_NAME | The endpoint URL from LUIS e.g. https://westus.api.cognitive.microsoft.com |
| LUIS_APP_ID | the Guid App ID from Luis |
Query Luis
So now we’re going to query the LUIS Endpoint from our app. Open up the LuisQuery class and add the following using statements at the top:
using Microsoft.Azure.CognitiveServices.Language.LUIS.Runtime;using Microsoft.Azure.CognitiveServices.Language.LUIS.Runtime.Models;using System;using System.Threading.Tasks;Next, inside the class add the following fields:
// Use Language Understanding (LUIS) prediction endpoint key// to create authentication credentialsprivate static string \_predictionKey = Environment.GetEnvironmentVariable("LUIS\_PREDICTION\_KEY");// Endpoint URL example value = "https://YOUR-RESOURCE-NAME.api.cognitive.microsoft.com"private static string \_predictionEndpoint = Environment.GetEnvironmentVariable("LUIS\_ENDPOINT\_NAME");// App Id example value e.g. "df67dcdb-c37d-46af-88e1-8b97951ca1c2"private static string \_appId = Environment.GetEnvironmentVariable("LUIS\_APP\_ID");Next, we’re going to create the client by generating a set of credentials from our prediction key, and using those credentials along with our endpoint. We’ll create a client in a static method.
private static LUISRuntimeClient CreateClient(){ var credentials = new ApiKeyServiceClientCredentials(\_predictionKey); return new LUISRuntimeClient(credentials, new System.Net.Http.DelegatingHandler[] { }) { Endpoint = \_predictionEndpoint };}The last thing to do here is to create a method that uses our prediction client to create a prediction. This method takes a string query, gets a prediction client, and adds our query onto our prediction endpoint.
public static async Task<PredictionResponse> GetPredictionAsync(string query){ using (var luisClient = CreateClient()) { var requestOptions = new PredictionRequestOptions { PreferExternalEntities = true }; var predictionRequest = new PredictionRequest { Query = query, Options = requestOptions }; return await luisClient.Prediction.GetSlotPredictionAsync( Guid.Parse(\_appId), slotName: "production", predictionRequest, verbose: true, showAllIntents: true, log: true); }}Add Dispatcher Code
Our Dispatcher is going to manage the business logic of what we want to do with our intents. Thus the first thing to establish is the enum for our intents. Add the following to your Dispatcher class:
public enum Intent{ None, OrderFood}Next, add the following using statements to the Dispatcher file.
using Newtonsoft.Json.Linq;using Nexmo.Api;using System;Next, we’re going to add a function, ExecuteQuery, to execute the query, create a response message from the result of the query, and send that message back to the endpoint. It’s going to take our inbound SMS message from our controller endpoint (which we’ll build next), pull out the message, and feed it through our LuisQuery class. If the query detects a None intent, it creates a message saying, “I didn’t quite get that. Can you please specify what you would like to do?” Otherwise, it pulls the food and restaurant name out of the message and replies to the customer that their food is on the way.
public static async void ExecuteQuery(SMS.SMSInbound inbound){ try { var query = inbound.text; var apiKey = Environment.GetEnvironmentVariable("NEXMO\_API\_KEY"); var apiSecret = Environment.GetEnvironmentVariable("NEXMO\_API\_SECRET"); var message = string.Empty; //Get prediction var pred = await LuisQuery.GetPredictionAsync(query); var intent = Enum.Parse(typeof(Intent), pred.Prediction.TopIntent); Console.WriteLine($"Top intent was {pred.Prediction.TopIntent}"); switch (intent) { case Intent.None: message = "I didn't quite get that. Can you please specify what you would like to do?"; break; case Intent.OrderFood: var food = (pred.Prediction.Entities["Food"] as JArray)?[0]; var restaraunt = (pred.Prediction.Entities["RestaurantReservation.PlaceName"] as JArray)?[0]; message = $"We'll have that {food} from {restaraunt} send over straight away!"; break; } Console.WriteLine($"Message: {message}"); //Send the SMS back var client = new Client(new Nexmo.Api.Request.Credentials { ApiKey = apiKey, ApiSecret = apiSecret }); client.SMS.Send(new SMS.SMSRequest { to = inbound.msisdn, from = inbound.to, text = message }); } catch (Exception ex) { Console.WriteLine(ex.ToString()); }}Receiving and Sending SMS
We’re going to be receiving SMS messages on our SmsController endpoint, querying LUIS, and responding back to the incoming SMS. To do this, let’s go into our SmsController class. The first thing we’re going to do is drop the Route attribute from the SmsController. Then in here let’s add a method:
[HttpGet("webhooks/inbound")]public IActionResult Get([FromQuery]SMS.SMSInbound inbound){ Dispatcher.ExecuteQuery(inbound); return NoContent();}You’ll need to import the Nexmo.Api namespace for this.
And that’s all the code we’re going to need!
Testing with IIS Express and ngrok
We’re just going to be testing this in IIS express, so let’s go to the debug tab of the project properties page. I’m going to disable SSL on IIS Express and take note of the port number it’s hosting on. Next, I’m going to run the following command in the command prompt:
ngrok http --host-header="localhost:PORT\_NUMBER" http://localhost:PORT\_NUMBERThat’ll start up ngrok and produce something like:
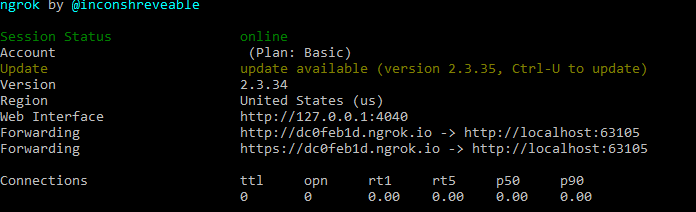
Take note of the unique id ahead of the ngrok.io in the URL. Let this be and start the app up in debug mode in IIS Express.
Configure Webhooks
Now all that’s left to do is to go to the settings page in the dashboard and change the inbound messages URL to http://UNIQUE_NGROK_ENDPOINT.ngrok.io/webhooks/inbound. Replace UNIQUE_NGROK_ENDPOINT with the random set of characters produced by ngrok. In the example above, the endpoint would be http://dc0feb1d.ngrok.io/webhooks/inbound. This points Vonage at our IIS Express server and allows us to receive messages on our SMS endpoint.
Time to Test
Now all that’s left to do is a test. The app should be up and running; all you have to do is to send a text message with your delivery order to any SMS-enabled number you’ve acquired through the Vonage API dashboard, and the order will be processed for you.
Next Steps
This demo was a basic example of how to work with LUIS. LUIS is a robust platform with lots of flexibility. However, as you’ve doubtlessly observed, it requires a lot of thought into how you’ll construct the knowledge base to be truly useful.
There are a ton of channels that Vonage’s APIs enable you to use to talk to LUIS through. You can use the Messages API, which supports Facebook Messenger, WhatsApp, and Viber in addition to SMS. LUIS also allows you to work with speech directly, so you could potentially build a bot that listens to speech from a PSTN call via Vonage’s Websocket API.
Resources
- You can find the full sample code in GitHub
- If you want to skip the model building and import the one I built for demonstration purposes, it’s available here.
- There’s lot’s of great docs for how to work with Luis on Microsoft’s docs site.
The post SMS Language Understanding with LUIS and .NET appeared first on Vonage Developer Blog.